Meet The Author

Main Uddin is one of the pioneer blogger cum e-marketer from North East India(Assam).He is also a Skilled web Developer and regular columnist for various news portals around the globe.Read More

author

Set up Online Shop with the Help of Shopify Instantly

Leave a Comment
Here’s a step-by-step guide on how to build your own online shop with Shopify.
I’ll cover all the basics and bit more, so you could get your online store up and running ASAP (We’re all busy, I know).
If you get stuck (I doubt you will), leave a comment or get in touch with me via contact form.
Let’s get started…

Set up Online Shop with the Help of Shopify

Signing up with Shopify and starting your store couldn’t be any easier and they even offer a 14 day free trial to get you going.
To launch your Shopify store, you must sign up for an account.

1. Sign Up with Shopify

To start, visit Shopify.com. Use the signup form to start creating an account.
Enter the required details and then click the ‘Create your store now’ button.
Your store name needs to be unique or Shopify will ask you to choose something else.
After this initial screen you’ll be asked for a few more details, these include your name, address, country and a contact number.
You will also be asked if you have products and, if so, what you aim to sell. If you’re just trying out Shopify to see if it works for you, you can select ‘I’m just playing around’ in the ‘Do you have products?’ dropdown, and ‘I’m not sure’ in the ‘What will you sell?’ section.
Once complete, click ‘I’m done’.

2. Start Setting Up Your Online Shop

After you’ve signed up you’ll be directed straight to your store admin screen. Now you are ready to start customising your store’s look, uploading products and setting up payments and shipping.
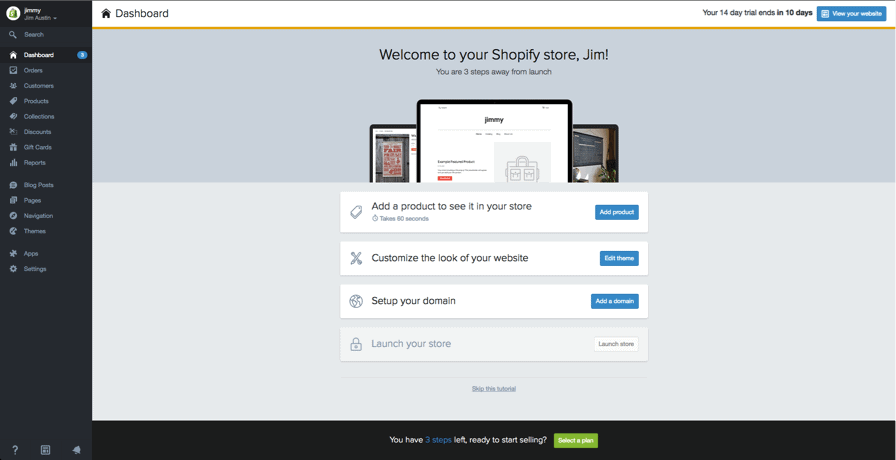
Shopify homescreen Your home admin screen tells you all you need to know to get you up and running.

3. Choose a “Theme” or “Layout”

Shopify has its own official theme store. These themes are all guaranteed to have full support from the designers so you know your store is in good hands.
All themes come with a comprehensive list of modifications you can make without having to touch a line of code. The premium themes come with more modifications, but that’s not to say you can’t achieve a great looking site with a free one. These changes are outlined in the next section.
If you want to make wholesale changes to a theme, there are very few limitations on what can be achieved by accessing the HTML and CSS. Don’t worry if you haven’t got any coding experience. Shopify has an international team of design agencies they call ‘Shopify Experts’ that you can hire to fully customise your site.
To find a theme that suits your needs we recommend the following:

1. Browse the Theme Store

Log into Shopify and visit the Shopify Theme Store at themes.shopify.com. Here you’ll find over 180 theme variations to choose from, including a good selection of free ones.
You can filter by paid or free, industry and by features. You can also sort themes by price, popularity, and most recent.
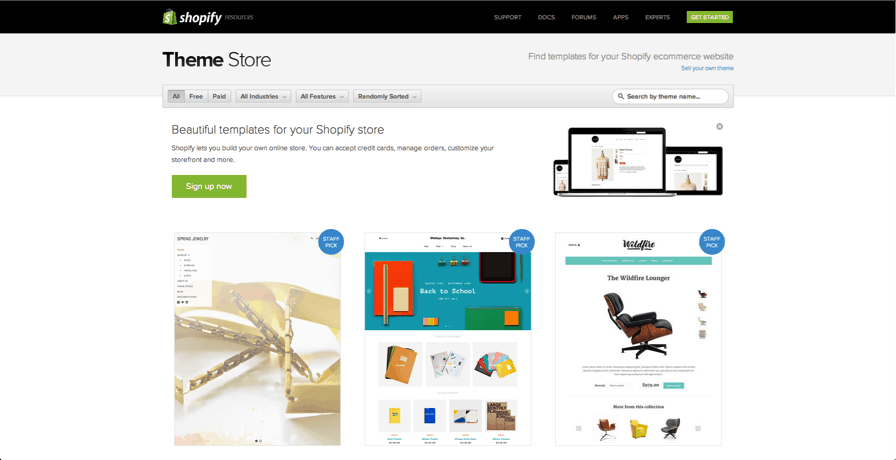
browse-theme-store The Shopify Theme Store.

2. Check the functionality and reviews

Once you’ve found a theme you like, click on the theme’s sample image. You’ll be given more information about the theme, such as whether the theme is responsive/mobile ready among other features.
Scroll down to read some reviews to find out what e-tailers using the theme think of it.

3. Preview the theme

To see the theme in action, click View Demo. You’ll see this below the green ‘Preview Theme in your Store’ button.
If the theme comes in a range of styles, you can also view demos of the different styles by clicking on them.

4. Get the theme

Once you’ve found a theme you like, click the green button.
Shopify will ask you to confirm that you want to install the theme.
Click Publish as my Shop’s Theme.
Don’t worry if you’re not 100% sure it’s the right theme for you. You can always change your mind later.
After the theme has installed, Shopify will let you know, and will give you the option to Go to your Theme Manager. Click this.
Your theme manager shows published themes (the one you installed or activated most recently) and unpublished themes below (previously installed themes).
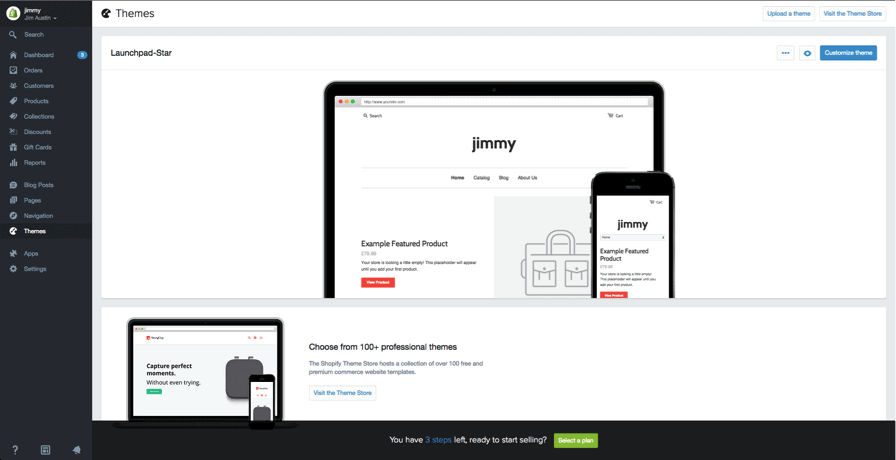
finish your ecommerce store

4. Edit Shopify Settings

The majority of Shopify themes allow you to make simple changes that can massively change the appearance of your store, so you can rest assured knowing you won’t end up with a website that looks like a clone of thousands of other stores.

shopify store templates
These stores are all built using the same theme.
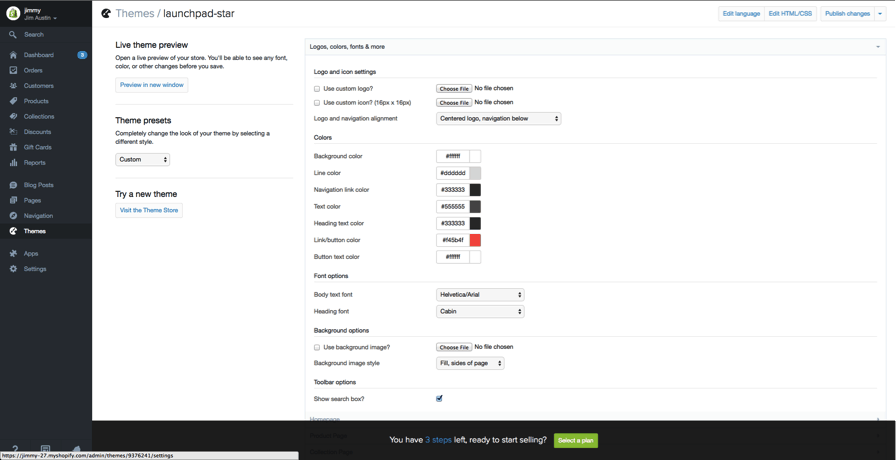
On your admin screen, select ‘Themes’ from the left hand navigation menu. On this page you will see your live theme in a box at the top, in the top right hand corner of that box will be two buttons. The first one is of three dots, which gives you some basic settings changes. One of these allows you to make a duplicate of the theme. We highly recommend you do this incase you make some changes you don’t like, then you can delete the duplicate and start again. The second button says ‘Customize Theme’. If you click that you will be taken to a page that controls all the basic functionality of your store. This is a great time for you to have a thorough play with the settings and test out all the features so you can find out what your site is capable of.
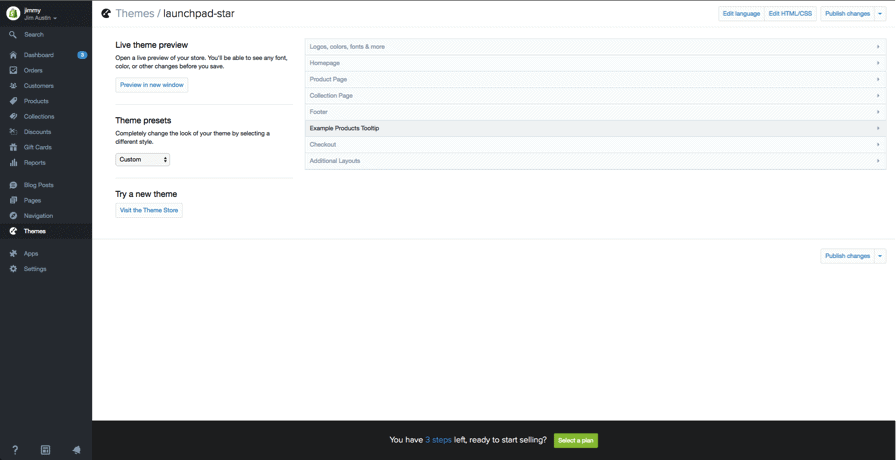
shopify custom theme settings
Your themes custom settings.
changing colours in your theme
Changing colours in your theme.
The most common features will include:
  • uploading logos
  • uploading slides to a homepage carousel
  • adding related item functionality to product pages
  • choosing how many items appear on each line of the collection pages
  • colour schemes
  • font choices.
Some themes will also allow you to reposition elements on pages such as showing product images on the left, right or center of the page. You can also choose whether you want to display social like/tweet/pin/+1 buttons.

5. Add Your Products to The Store

Again, navigating from the bar on the left select ‘Products’. You will then see a blue ‘Add a product’ button in the top right hand corner of the page. Use the following screen to add as much detail as needed about your products. Especially look at those that will help with SEO such as name, description and URL. Also include as much detail about variants as possible to help inform customers about your items.
This is also the screen where you upload product pictures. Once the images are uploaded you can rearrange them so don’t worry about uploading them in any particular order.
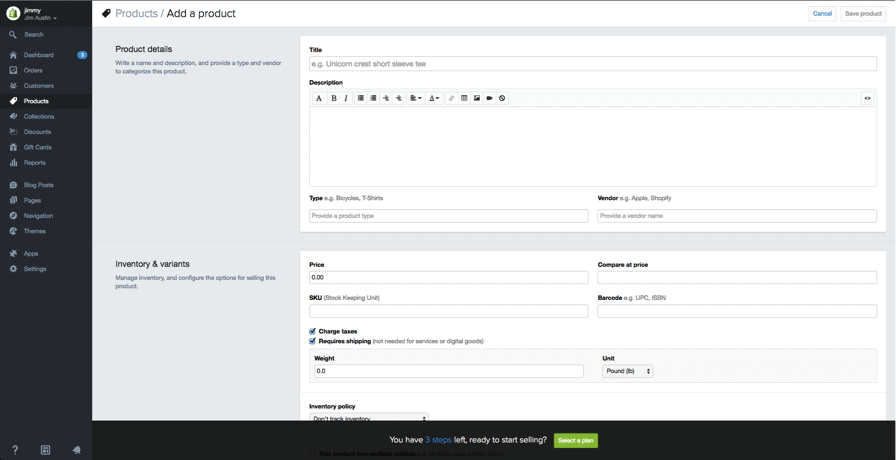
Your product screen
The Product screen. Make sure you fill out as much information as possible.
Product images can make a sale so make sure you show your products off to their best and highlight any special or unique features with close up photos. To keep your store looking tidy we suggest you keep all images the same dimensions. Unless of course you plan to make your collection pages look like a Pinterest board.
Once everything is filled out always remember to click the ‘Save product’ button in the top and bottom right hand corners.

Set up collections (group of products)

A collection is any group of products that have some feature in common that customers might look for when visiting your store. For example, your customers might be shopping for:
  • clothes specifically for men, women, or children
  • items of a certain type, such as lamps, cushions, or rugs
  • items on sale
  • items in a certain size or color
  • seasonal products such as holiday cards and decorations.
Products can appear in any number of collections. Usually, you would display your collections on your homepage and in the navigation bar. This helps customers find what they’re looking for without having to click through your whole catalog.
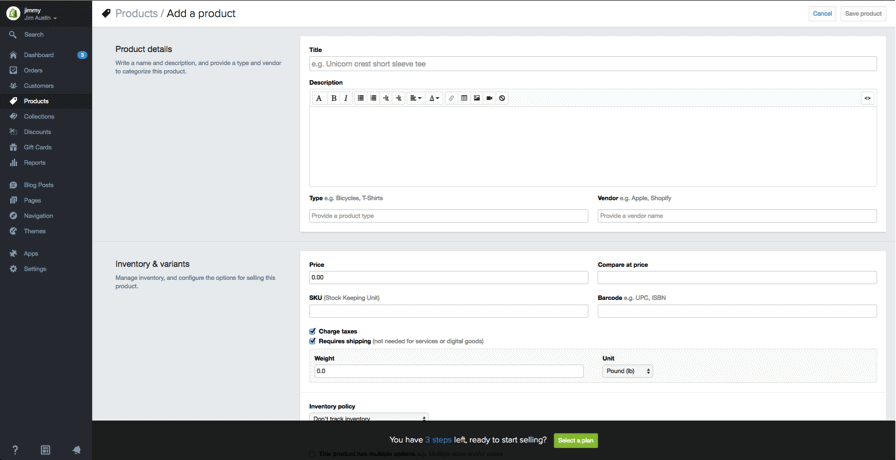
Your product screen
The Collection set up screen works in exactly the same way as the Product screen

Manual and automatic collections

When you add a new collection, you can select how products should be added to it. These are the two options:
  • Manually -
You add and remove products in a manual collection individually.
  • Automatically -
You can set up selection conditions to automatically include products that meet certain criteria.
Payment gateways
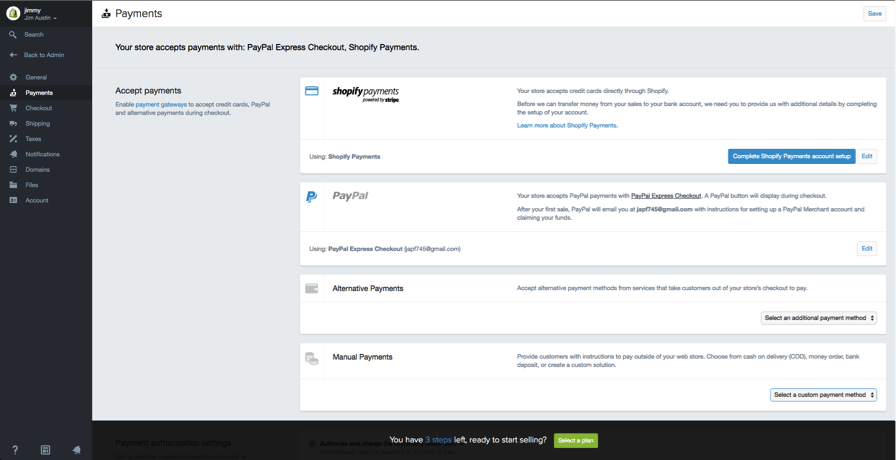
A payment gateway allows you to take payment from your customers via your website. The price and commission rate is important, but it’s also important to see what features they offer. Not all payment gateways are created equal.
You need to look at the following when choosing the right payment gateway for you.
payment gateways
  1. Transaction Fees
When you take a payment, some gateways will keep a small percentage or flat fee (or sometimes both) for letting you use their service. Compare these based on what your anticipated sales are.
  1. Card Types
You need to know what types of card are accepted by your chosen Payment Gateway. All accept VISA and Mastercard, while most accept American Express. Paypal is also becoming popular for online payments.
  1. Offsite Checkout
Some gateways will take the payment on their own servers via their own form. This means the customer is taken away from your checkout and they pay on the form provided by your payment gateway. They are then redirected to your confirmation page once the customer successfully pays. This allows you to have a bit more control of the checkout process. Now you can circumvent Shopify’s limitations in that they don’t let you customise the checkout other than with CSS.
Payment gateway transaction fees are added on top of Shopify’s own transaction fees. However as of November stores based in the US and UK can use Shopify Payments. Depending upon your Shopify plan, you can save on these extra costs. Relative to your plan you will receive these highly appealing rates.
  • Basic 2.4% + 20p
  • Professional 2.1% + 20p
  • Unlimited 1.8% + 20p
Depending on how many transactions you make every month it could be worth upgrading to take advantage of these savings.
If you live in the US or UK your store will automatically use Shopify Payments. To complete this, click the ‘Complete Shopify Payments account setup’ button found in Settings > Payments. If you wish to use a third party gateway you can use the ‘enable payment gateways’ link on the same page.

6. Get Your Online Shop “LIVE”

Before your site can go live you need to add a few more details about your company and how you plan to make deliveries and pay tax.

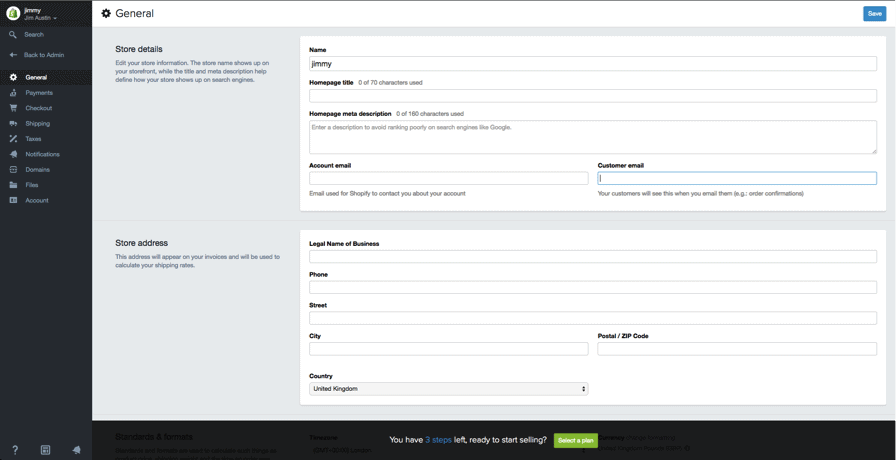
General

Make sure all your business information is filled out on this page. Also make sure to make use of the Google Analytics feature. This can prove to be an invaluable source for tracking your stores visitors.
general shopify settings

Taxes

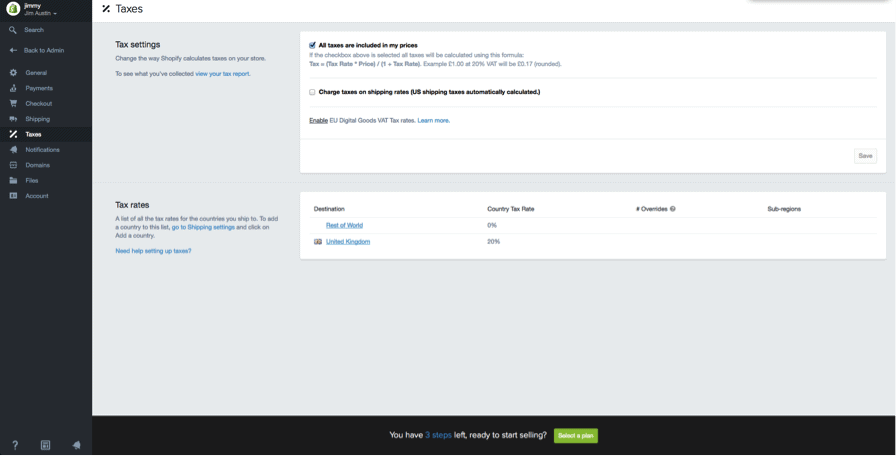
taxes for shopify online store

  1. Go to the Products page of your admin
  1. Click on the name of a given product.
  1. Scroll down to the section called “Inventory & variants”.
  1. Click on the edit link next to your Product Variant to open a dialog window.
  1. Make sure the checkboxes next to Charge taxes and Requires shipping are checked if you need to include these with your products.
  1. Some stores won’t need to charge taxes or shipping on products like digital goods. On the other hand, a T-shirt store will likely need to charge both.
  1. If you are planning to ship your product to customers, make sure to enter the product’s weight in the appropriate field.

Shipping

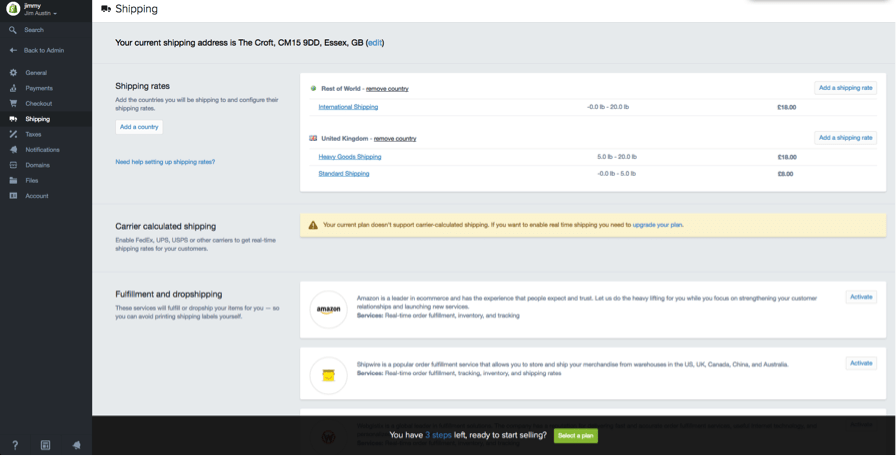
If your shipping rates are too narrow, or you don’t give enough options, you may lose out on some sales. Shopify will only calculate a shipping rate for your customers based on the rules that you define in the Shipping page of the admin. To make sure you won’t lose any sales:
shipping
  1. From your store admin, go to the Settings > Shipping page.
  1. In the “Shipping rates” section, look to see if you have set a weight-based shipping rate and adjust it according to your product’s specifications.

Test your order system

To test your system you can simulate a transaction using Shopify’s Bogus Gateway.
To use the Bogus Gateway:
  1. From your store Admin, click Settings, then Payments to go to your Payments settings
  1. If you have a credit card gateway enabled, deactivate it before continuing. (Click Edit, then Deactivate, then confirm your deactivation.)
  1. In the Accept credit cards section, click Select a Credit Card Gateway to open the drop-down menu.
  1. Scroll down the list to Other, then click (for testing) Bogus Gateway.
  1. Click Activate (or Reactivate, if you’ve used the Bogus Gateway before).
  1. Go to your storefront and place an order as a customer would. At checkout, enter the following credit card details instead of genuine numbers:
Testing a real payment gateway with a genuine transaction:
  1. Make sure you’ve set up the payment gateway you want to test.
  1. Make a purchase from your store as a customer would, and complete checkout using genuine credit card details.
  1. Cancel the order immediately, to refund yourself and avoid paying transaction fees.
  1. Log in to your payment gateway to make sure the funds went through.

Is this free?

Yes – just be sure to cancel and refund the order soon after you place it.
If your billing cycle hits after you’ve placed the test order but before you cancel it, the transaction fees will appear on your bill. You can still cancel after paying your bill to Shopify, but you’ll receive the refund as a transaction credit on your account. You can use transaction credits to pay future transaction fees.

7. Consider Buying a Domain Name

To get your site live you’ll need a domain name. You have two choices for this. Firstly you can buy a domain from Shopify and it will be added to your store automatically. This saves you time, especially if you have no knowledge of hosting a website. These domains typically cost $9-$14 USD per year. Your second option is to purchase a domain from a third party such as GoDaddy. These domains start from $1.99 USD a year. The downside is that you’ll have to redirect the DNS records yourself which can seem daunting at first.
If you’re unable to come up with a good domain name, read my tips on how to choose a domain name.
Here are the steps to put your new Shopify store live on a third party domain name.
  1. Add the new domain in Shopify
In the Shopify admin, from the left hand navigation go to Settings and then Domainsand add your domain name using the ‘Add an existing domain’ button.
  1. Update DNS records
Login to your domain registrar and make the following changes to the DNS records:
  • Replace the @ or main A record with the following IP address: 23.227.38.32
  • Add or replace the www CNAME with storename.myshopify.com (i.e. your store Shopify link without the http bit, which you can see on the domains settings page)
  1. Remove any storefront passwords
Otherwise no one will be able to access your site even once it’s live.
  1. Set as primary if relevant
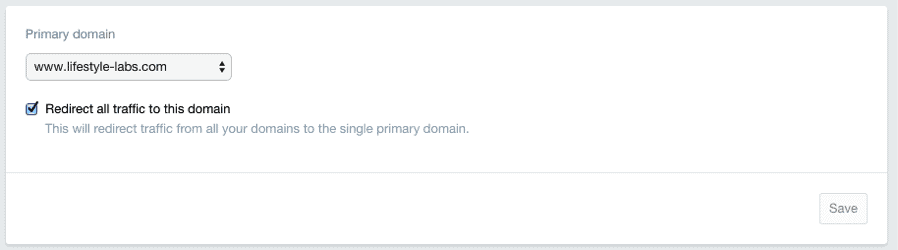
Whilst in Settings > Domains, you can choose your main domain by using the dropdown at the top of the screen:
primary domain
Ensure that you also check the ‘Redirect all traffic to this domain’. This means that traffic to all other domains will be directed to your primary domain. This is crucial for good SEO.
  1. Adding other domains 
You can repeat steps 1 and 2 with other domain names you own. All domain names will redirect to the ‘Primary’ domain, which you can change at any time with the ‘Set as primary’ option next to each domain name.
Note that the number of domain names you own has no influence on SEO.
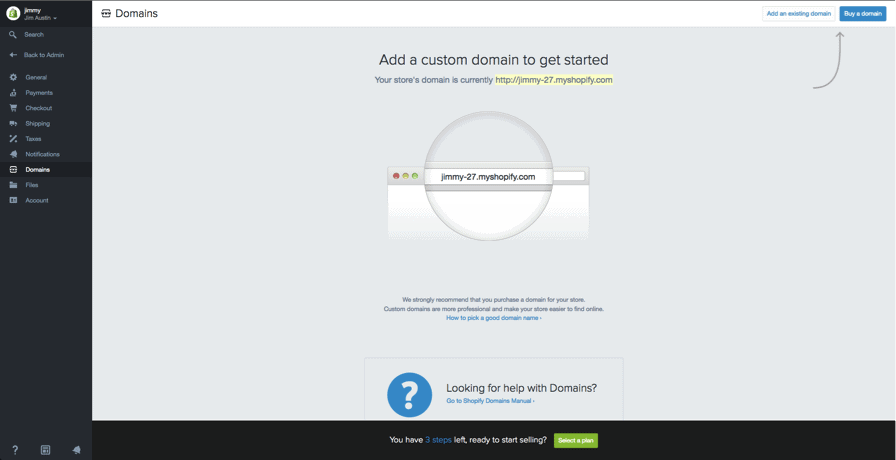
adding custom domains on shopify

Conclusion

And that is all there is to it. In theory you can have a great looking, unique and fully-functioning store in less than half an hour without having to be a web expert. This way you can spend most of your time marketing your product rather than having to maintain the site.

Alternatives for Shopify?

I’ve been mainly using WordPress & WooCommerce combo (cheaper & easier), but Shopify can be a good alternative.
For further reading: Shopify vs. WordPress (WooCommerce)
Furthermore, you can actually build an ecommerce site with website builders, too. If you want to check them out, read my website builders review here.
In regards to customisation, Shopify allows almost every aspect of their templates to be altered in some way. You can also change the functionality of most parts of your site. On top of this they also have the largest app store for added functionality. Comparatively, Volusion only has one template that can only have minor changes made to it.
The only real downside is not being able to fully customise your checkout. Shopify restricts access to this page for security reasons. However the checkout comes fully responsive, so it will work perfectly for customers shopping on mobile devices.
Read More

Marketers Refer Google Apps - Earn up to US$750 per referral- Start referring today

Leave a Comment
Mobile apps ecosystem has grown in the past couple of years to become lucrative business for app developers and platform owners. Such has been the craze for applications these days, that you have educational courses based on coding and app development especially for Android. People centered around the business have made a lot of money but now Google is giving consumers the chance to make money which will benefit their business in the end. 

Marketers Refer Google Apps - Earn up to US$750 per referral.


By joining the Google Apps Referral Program, you’ll receive US $7.50 for every user who signs up using your link. Google Apps for Work gives businesses the tools to get more done with professional email, online storage, shared calendars, video meetings and more.


Thank you for joining the Google Apps Referral Programme


You're on your way to helping customers, friends and others experience a better way of working.

To get started, check your email for your unique referral link, coupons to share and more.

Can’t find your welcome email?

First, check your Promotions tab in Gmail or spam folders and if you still can't find the email after 24 hours, email us at AppsReferralProgram@google.com.

Sign up and start referring today.


Just provide your name and email address 
You’ll receive your unique referral link in your inbox 
What you need to know 
A bank account is required to receive direct deposits 
The programme is available in select countries 

"The referral program makes it easy to share Google Apps with your network and show them how they too can use these tools at work. You'll earn $7.50 for each new Google Apps user you refer", as mentioned by Google on the referral page.

Join-Share-Earn is the modus operandi within which the referral program works and here's how you stand a chance to make money by referring apps to one or more users.
- Register with your email ID, add bank a/c details (where money goes directly).
- Once you've registered, Google will send you a referral link to be shared.
- More the people signing up for the app, more money you get to earn.
- The money gets transferred to your bank a/c you shared and there's even coupons too.

Referral program is another interesting initiative from Google and India is one of the 120 countries wherein the service has been made available. Want to make extra buck? Google referral program may be the best (and legitimate) way of earning quick money without putting much effort.

Frequently Asked Questions


1. Where can I find my referral link?

Your referral link can be found in the welcome email you received after registering for the program. The email was sent from the Google Apps Referral Program and you should receive it within 24 hours.


If you can’t find your welcome email, please check your "Promotions” tab in Gmail. You can also email AppsReferralProgram@google.com with the email address you signed up with if you still can’t find your link.

2. How much can I earn?


As a member of the Google Apps Referral Program, you can earn US $7.50 per user for every new Google Apps for Work customer you refer. You are eligible for payment on your customer’s first 100 users and there is no limit to the number of customers you can refer.


A user is an individual account belonging to the customer domain. Your referral amount will be based on the number of users who have paid for at least 120 days.

3. Who is eligible for referral payment?


Customers are eligible for payment if they are new Google Apps for Work customers and have not previously signed up for a trial.

4. How does the coupon code discount work?


If you provide a coupon code to one of your referrals, he/she is entitled to 20% off per user for the first year as a Google Apps for Work customer. Your referrals can enter their coupon code in the Billing section of their Customer Admin Console when they sign up or throughout their 30-day trial period.

Each coupon code is unique and can only be redeemed by one customer from the country you signed up in.

5. When and how will I get paid?


You will be eligible for payment once your referral has been a paid Google Apps customer for at least 120 days. When you’re eligible for your first payment, we’ll reach out for your banking information through our secure form. You will then receive a direct deposit in your bank account.

6. Why haven’t I received my payment in my bank account?


Payments are processed on a monthly basis. If you did not receive a payment, you will likely receive it during next month’s payment cycle. Please contact AppsReferralProgram@google.com with your account details to verify.

7. My referrals forgot to use my referral link. Is there a way to track it back to my account?


We're unable to track referrals back to your account if they did not use your referral link at the time they signed up.

8. Can I get paid for previous customers I referred before the Referral Program launched or before I signed up?


The Referral Program tracks referrals that are new Google Apps for Work customers. We cannot grant referral credits to customers who have signed up or started a trial before the program launched or before you joined.

When will the Referral Program be available in my country?


The Google Apps Referral Program is currently available in the US, Canada, Australia, Brazil, Spain, India, Chile, Colombia, Mexico, Japan, New Zealand, Singapore, Hong Kong and the UK. We don’t have exact timing, but hope to expand to your region soon. Let us know where you’re located and how to contact you once we do.

9. Can I refer customers in any country?


You can only refer customers in the country programs you signed up for. Currently, the program is available in the US, Canada, Australia, Brazil, Spain, India, Chile, Colombia, Mexico, Japan, New Zealand, Singapore, Hong Kong and the UK. You also need a bank account in each country you register for.


For example, if you live in India and would like to refer customers that work in the US, you must sign up for the US program and have a US bank account that can receive direct deposits.


At this time, credit will not be given for referred customers outside of the countries listed above.
Read More

Top 10 Viral Marketing factors for Bloggers and marketers in Social Media-2015

Leave a Comment
One of my friend whom I know very little personally but always respect his knowledge and researching confidence either marketing or planning sector. He is the Prof. Arpan Kar who was one of the renowned a faculty member of the Information Systems & Management area in Indian Institute of Technology Delhi and 34 publication on his name. Today's article directly dedicated to his "10 mantras of marketing success" thesis which was the cause of his Phd from IIM. 

Top 10 Viral Marketing factors for Bloggers and marketers


By definition, social media marketing describes the use of social networks, online communities, blogs, wikis or any other online collaborative media for marketing. In recent times, this has been used extensively to market content (blog) and products, even those with B2B utility. Commonly this had been achieved using social media like Facebook, ,Google+, Stumbleupon, Flicker, Reditt, Twitter, Delicious and lots of other upcoming new sites like Yahoo Buzz, Mixx, Fark, Shoutwire, eBaumsworld and others (e.g SWOM, the latest kid on the block). So how does one use the power of social network to market one’s content or product? Following these few steps may ensure success of your marketing efforts.

1. Don’t launch your product first. Spend time to understand the dynamics of the social network which you want to use before using it. The dynamics of Digg are very different from Stumbleupon. So the same strategy won’t work in all places.

2. Create a network on that media before using the same. Always introduce yourself to your network. This creates a long term benefit. Also collaborators are crucial for your success. Identification of these collaborators are extremely important before you launch your product.

3. Decide your media based on the product which you want to sell. Not all kinds of content/products are suitable for all the social media. Research has indicated that multimedia content is more preferred in sites like Stumbleupon, Facebook and MySpace, while information (textual) is more preferred in sites like Digg and Reditt. Flicker for instance is only suitable for photos.

4. Interact regularly with your customer segments. Degree of personalization will impact the success of your marketing efforts. A humanitarian approach always speaks volumes and increases trust of the consumers. A relationship is beneficial in the long run, as then he will promote your product (promotion without investment and may start a chain of promotion)

5. A unique strategy is always crucial for your success. Remember, everyone is using the same tools which you are using. How can you make a difference when you are doing the same thing which others are doing? Decide on a long term goal before focusing on the short term implementation necessities.

6. Ensure that the fans of your product can promote a message themselves to their social network in multiple online social media venues using WEB 2.0. These buttons must be highly visible to actually prompt them to do it, and the process must be very easy.

7. Never SPAM! Your customers can always see what you are promoting in your group/fan page. A no reaction from them may mean they are not interested in this particular offering. Overdoing may irritate them enough to leave your network altogether.

8. Remember “Viral marketing” based around “online conversations“. Social media marketing cannot be controlled by you. But try to encourage user participation and dialogue so that the chain can start. A badly designed social media marketing campaign can potentially backfire on you.

9. Respect your partners and customers. Always remember they may be seeing through your intentions, even if they may not express that clearly, if you are trying to tweak around. Trust is crucial for your success.

10. You must learn to collaborate with others and be transparent about it with your partners. Always be clear about the benefits the relationship will have on both. Both are here for a professional reason only. Be sure both the collaborators are clear about that, to ensure a long term relationship.

These 10 points of business success were indirectly taken from Prof. Arpan Kar's article. Hence, I hope, by following these simple steps may do wonders for your social media campaign. Let me know how you fare success will come to your end.
Read More

Evergreen open source 10 most used PHP Shopping Carts

Leave a Comment
E-commerce has become more popular than any other form of business for small and middle class business industry due to available of World Wide Web default access around the globe. With so many PHP shopping cart products available in open source market as any one one can choosing one that best fits his/her e-commerce project. I have already published a few articles on shopping portal and CMS system of e-commerce websites, eg-  Top 10+ Ready Made platforms before you want to start shopping portal
But reality is differ from talking for choosing a ecommerce shopping cart. So, We have tried our best observation on PHP based shopping carts. It carries the close impressions of the 10 popular free PHP shopping carts to help business owners for deciding the best one for own use. 


One of the most popular free shopping carts available, Virtuemart, is a Joomla component. The community is large and you can find help on many forums. The user's manual is included in the installation package. Many shipping and payment modules are already installed; you just need to enable the ones you need. Tax rates by country, combined with currency and language settings, can help you adapt your store to the local market. This shopping cart also supports reports by date and by individual product, but it doesn't have the option to create low stock reports.

Also, you could make use of third-party Virtuemart modules, as well as Joomla modules. However, this can create problems when bugs and compatibility issues arise.My overall impression is that except minor potential issues, this is a really great cart that can help you run your ecommerce site.


PrestaShop is a great choice for a quick ecommerce set up. Installation takes only two minutes, and after an install you can watch helpful video tutorials or download the free user's guide. The admin layout is good, and the overall look-and-feel, which features a nice sales-of-the-week graph, is even better.

While sometimes buggy, PrestaShop is feature-rich -- until it comes to shipping. Although FedEx and UPS are supported, you don't have the option to calculate standard shipping based on weight. Module cost is another disadvantage of this cart, because a great number of its modules are not free.


The developers of TomatoCart have done a great job making the cart very easy to install and use. The installation takes no more than two minutes, and the admin tool is very easy to use, especially for Windows users as it has the same look and feel. It also offers many useful options such as gift certificate and coupon creation and integrated payment options, such as Paypal, Moneybookers and the Authorize.net gateway.

The default template has a modern design, and the visual user experience features a carousel slideshow for products. There are a few shipping options, but TomatoCart doesn't support automatic UPS or FedEx shipping cost calculation. Furthermore, it doesn't have a system for installing custom modules, which makes the modifications more difficult.


Magento is not easy to install, as it requires a PHP extension that is not installed on all servers by default. But once installed, it becomes obvious why it is so popular.

It supports a "shop by category" option, which is similar to eBay, and offers most shipping and payment options. One of its exceptional features is the ability to run multiple shops from one backend. Magento is highly customizable but not user friendly. Installation requires server knowledge, and the backend can be confusing at times. Also, it occasionally runs very slowly, so buying a powerful server is a must. Overall, I found this shopping cart best suited for people who want to run a serious ecommerce business and can afford the required server and Web development resources.


The osCommerce shopping cart's greatest strength is security. The admin login is blocked after three unsuccessful attempts, and you can also change the path to the admin folder or set the minimum and maximum order field values. The user features are good as well. You can easily offer discounts to your users, and improve their satisfaction by allowing them to write a review. Also, they can share a product on Facebook or Twitter.

OsCommerce also supports different product versions, which is great for selling software or products that are sold in many colors. There are many integrated payment options to choose from (Paypal, Moneybookers, Authorize.net, 2Checkout, etc.). It also enables you to customize your store according to market by adding currencies and languages. Though custom modules can be installed, you need some PHP knowledge to make them work correctly.


Unlike Magento, OpenCart is easy to install and set up. The user experience is great -- customers can shop by brand, read or write product reviews and see related products. Website owners should also be satisfied with this cart -- there are minimal bugs, the product stock status and versions can be set, and much more.

One of the negatives of OpenCart is that its pre-installed options are limited. It relies heavily on third-party modules. For example, FedEx and UPS calculations can be set up only through a custom module. Also, the reporting features are lacking. For example, reports such as the low stock report are not supported.

7: OsCSS

The first thing you will notice about the OsCSS ecommerce software is that French is the only language choice during installation. Although the cart supports multiple languages and they can be installed manually, the developers decided not to pre-install English. Also, some installation options don't work well. For instance, if you decide to disable URL rewriting, your cart won't work at all.

When you log in to the admin interface, the impression of OsCSS is much better. Some of the most notable functions are the ability to upload custom modules, create an XML sitemap and install multiple languages.The biggest disadvantage of this software is the checkout module, which lacks integration for the most popular payment options.


Zen Cart software may be difficult to use for users with no Web development knowledge. It offers many customization options, but they are not organized well and not easy to understand. Furthermore, when the software is installed, it requires that you manually edit files in order to change the location of the admin folder.

On the other hand, the overall user experience is good. Zen Cart supports most of the important options for a shopping cart, but some of them, such as VeriSign or Worldpay payments, must be installed manually. If you need a feature-rich ecommerce solution and you are ready to spend some time learning how to use it, install Zen Cart.


Cube Cart is very user friendly. It is installed quickly, and the admin is easy to use. However, it is not as feature rich as other shopping carts. A Cube Cart shopping cart cannot be fully adapted to local markets as it doesn't support different tax rates for countries. It has multiple shipping options, but FedEx is not supported. Users can pay via Paypal, Moneybooker or the Authorize.net gateway, but there is no integration for VeriSign.

Shopping experience features shopping by category and mailing list modules. Cube Cart is also somewhat buggy, but it can be useful if you need a quick and simple solution.


For those who like to use Drupal, Ubercart can be very useful. This module offers quick installation and setup. Many shipping and payment options are integrated and are available in the core installation.

The problem with this module is that many features require third-party solutions, that is, other Drupal modules. Keeping in mind that it lacks a good user's guide and that most bugs don't get fixed, module incompatibility problems could be very difficult to overcome. Moreover, there are many small bugs, which can also be difficult to fix. However, it works well with the CCK module. If you like Drupal and want to run an ecommerce site, consider this solution.

Editor's Note: This article/review is written on the given data of Voja Janjic who is a well known PHP programmer with more than 8 years' experience as well as my friend and well wisher too.
Read More

10 years of Viral content creation and hidden factors of global traffic

Leave a Comment
I was started my blogging in 2004 when I was final year student of MBA in Madurai Kamraj University as a fashion to maintain daily diary. After completing my study life, travelled one company to another and finally, I had left my regular job and entered full time online worker. Blogging and Freelancing were my main pathways to earned my bread and butter on those days with lots of hardship. I had written 10+ articles on this matter, so don't want to give you boring by drugging same drum once again. In 2013, I have founded a news portal (Indilens !Insights of India) and I had got the idea of viral post or article such a few news reports got 1000's of hits globally but why? A lots of questions risen on viral article and news topic such What makes content go viral?

10 years of Viral content creation and hidden factors of global traffic  


I know that it is a tough question, but when you look around, there’s some people who are able to craft contagious content every single time as my news portal get minimum 1 article daily.

What’s their secret? Do they know something you don’t?

I can say that every one can able to do so, creating viral article or reports for their wb portal and blogs. And while they may not be aware of it, they know how to push the little “traffic buttons” on the internet without fail.

How do I know this? Because I’ve done it… for years. And until recently, I was never able to explain exactly how I was able to do it. But today, that all changes.

Before getting insight of the topic, I want to mention a name Jonah Berger who is an assistant professor of marketing at the Wharton School of Business with specializes in discovering what makes ideas and products go viral. I had learned a lots from him via his articles and books. It is mentioned that he is featured in many of the prestigious marketing research journals and publications like the Wall Street Journal, New York Times, The Economist and more.

Here is the basic factors of viral post: 

1. Positive content is more viral than negative content.

2. Content that evoked high arousal emotions—positive or negative—is more viral than content without emotion.

3. Practically useful content get’s shared.

4. A little controversial with attraction of legacy. 

5. Touching emotions of thousands. 

If your post/article carries any one character above mentioned, then It’s tough to make a blog post go viral. However, I am using some other legal tricks to make a article go viral. Here are a few of my legal tips for readers. 

  • Submit to Google+
  • Submit to Reddit
  • Submit to StumbleUpon
  • Post on Forums in niche
  • Submit to Yahoo Buzz
  • Submit to Delicious
  • Post to Twitter
  • Post to Facebook
  • Post to meetme
  • Post to Google news
  • Post to YouTube (if applicable)
  • Submit to Technorati
  • Post to Pinterest (if applicable)
  • Post to LinkedIn
  • Provide SEO keywords for images
  • Directory submissions
  • RSS directory submits
  • Forum comments
  • Relevant blog comments
  • Social bookmarking
  • Refer to posts on Yahoo! Answers
  • Refer to posts on LinkedIn
  • Refer to posts on Quora
  • Press releases
  • Link to our own past and future blog posts
  • Add to your email signature
  • Add to your signature in forums
  • Add to your next newsletter
  • Request other bloggers to mention your post

Final words from author: 

As a content creator and freelance journalist, I want to say that blogger or portal owner must look after a few other factors before publishing the post such correct keyword optimize of the post, Adding pictures next to key items with alt tag, proofread the post to check for errors with proper correction. I am sure, if any one follows the above mentioned, then surely targeted post will go viral. 

Read More

Stop Wasting Time in Blogging to Make Money Online Now These days

Leave a Comment
It was 2004 when we had started blogging to make money online. There were only very few people were working in that blogging industry from India to make money online. As per available information says that the countable figures from that very had got success in make money online via blogging. I think that the pioneer names are known to all those are still working in blogging industry to make money online. 

Stop Wasting Time in Blogging to Make Money Online Now These days


You heard somewhere that you can make money blogging. It’s something magic: someone said that you can work 4-hour daily, from everywhere in the world, and make lots of money…much more than you could do with a full-time regular job! You dreamed about passive income, and finally you had an easy chance to get it, so you got on the boat: you started your own blog. You worked on it and took information about blogging.

To tell the truth you worked hard on it, and you read everything you could read about it. But, since the beginning, you haven’t earned a lot of money from your blog. You tried everything, but you just get few cents (and maybe not even them).Some time, it is seen that some bloggers earn very few pennies after working 15 to 20 hours daily.

What’s missing?

Traffic? Comments? Tweets or likes? Email subscribers?

No, it’s something more important. Blogging (Alone) to Make Money Online is a Waste of Time. Many people think that they can monetize their blog with ads. Yes, you can do it, and you can even have a decent income with that approach…but do you really want that? To live by blogging ads you need to have a HUGE traffic direct to your blog. You can bring that amount of traffic to your blog, but how much work will it require?
A lot.
Is your hard work worth the prize?
I don’t think.

Life is one and time is extremely precious. Every second you waste will not come back. You want a passive income to enjoy the most of the time you have. It’s a non-sense to waste an enormous amount of time for few cents. Other people think that they can monetize their blog with ebooks.

This a better approach. Much better!

You’ll need a smaller traffic to have a decent income. But, again, your way on a decent income is quite long. Ebooks and ads are 2 of the most used ways to monetize blogs online. Both of them will require a lot of work and maybe you’ll never reach the full-time income with them. You are working hard to get a small amount of money.

Now let’s consider a different approach.

Stop Blogging, You Want an Online Business. Stop thinking to you blog as a blog and start thinking about it as the way to start your business. This is the only way with which you can make a good quantity of money without working like a slave. And it’s the best way to reach the success you desire.
Considering your blog as part of your business will give to your strategies a radical shift:

1. You Work Seriously on Your Business

If you consider your blog just a blog, you will not push yourself to bring it to the next level. You will not write your posts if you don’t want. You will not promote your blog if you don’t want. When you think to your blog as the base of your business, you will force yourself to write posts, promote your blog, write guest posts, reach other bloggers and many more… You take it seriously because you know that you are working on the source of your income.

When I started my first blog in 2004 on blogger.com platform, I wrote posts and then I published them after a quick review. Now, I write a post (not regular) but take care :
  • I read it carefully
  • I change many elements
  • I try to improve it as much as possible
  • I edit it
  • I publish the ultimate post
I do these because my posts are windows to my business.  If I don’t do the best for you with my posts how could you trust my business? I want to give you my best, so I do my best to my News Portal Indilens and SEO company website Focusa2zThis approach is a key for your online business success.

2. You Invest in Your Online Business

Would someone with a healthy mind invest in blogging?
No way. No one will invest in something that will not give a reasonable return of investment. Instead, if you consider your blog as part of your business, you will invest in it. You know that to start a business you have to afford some costs. It’s ok, because you know that once you get on the right track, you’ll get money from it. To build a solid business with to your blog, you need to invest. Anyway the costs of your blog will be smaller than the ones for an offline business. Do you know that starting an offline business takes from 7000$ to several thousands of dollars?

Well, with a blog you can start your business with less than 1000$ dollars: Web hosting is about 90-120$ dollars per year (with BlueHost). An email software like Aweber (the best one) only costs 194$ per year. A formidable WordPress theme (like Genesis) will only cost 50-100$. Trainings to speed up your blog have various costs…for example, the best guest posting training is only 100$. 

An offline business may take years to cover the initial investment, with an online business, in 6-12 months you start enjoying your work. If you want to make money online, be serious about your business: investments are an essential part. Try to avoid them when it’s possible, but some of them are indispensable.

3. You Work on Different Sources of Income

At the beginning of this post, we talked about ads and ebooks as sources of income.

I’m not contrary to them, but it’s crucial to be smart. Are your ads a support to your income or are they the main source of your income? In the first case, I think it’s ok (even thought it’s not the best strategy). In the second case, you may want to review your priorities. The same applies to your ebooks. Ebooks are great because they are easy to make and easy to sell, but they should be a side strategy. You can get experience and build authority with your ebooks (they are perfect fits as first products), but then pass to “heavy things”.

You have many ways to build the core of your online business income:

  • Courses (live or video)
  • Consulting (1-on-1 or companies consulting)
  • Membership sites
  • Physical products
  • Softwares
  • Seminars or Webinars
  • Audio products

With my first ebook, I made some money from it…but the average earning for first few months was less than 100$. When I launched my first video course, I made 300$ in 10 days!
Do you see the power of these sources of income?  Why should you limit to ebooks and ads? Notice that all the suggestions listed above have a bigger price than ebooks.

4. You Stop Making Silly Things

I did lots of silly things; it’s normal when you don’t understand. When I started my first blog, I published 5 posts per week in the first few months. I saw that “strategy” from other bloggers, so I thought it was the way it had to be. I wish I published half of those posts. I wish I spent the time saved in that way bringing my posts to more people. It was a wrong strategy to publish 5 posts per week. When you think to your blog as a blog you don’t ask yourself key questions.

When you think to your blog as an online business you start asking yourself:
Is this task going to help my business?
Is it worth my time?
Can I do it better?
Is there anyone that can teach it to me?

“It is not the answer that enlightens, but the question.” – Decouvertes 

These questions will help you to find the best strategies to succeed.

5. You Aren’t Afraid to Sell

It’s fun: many people use content marketing to make money with their blogs, but they forget to sell.
The marketing part in content marketing is equally important as the content part.

Some bloggers feel shame to sell their stuff. They think it’s awkward to sell their products explicitly. When you have a business, you know that you have to sell. It’s normal: you have a business to sell something.  If you have something phenomenal to offer, you even feel proud to sell: you know that you are doing a kindness to offer your great services/products.

The best businessmen know that

They think: “My services are so awesome that you should be silly for not buying them”. People perceive that and think: “Wow! Look at him: he’s so proud of his services that they should be phenomenal. I should be silly for not buying them”.

Final views from author: 

The choice between blogging and online business depends on your goals. Are you blogging or are you running an online business with your blog? Let me hear your opinion . Also, if you have any question, I’m here to answer to you.

Read More

Normally Trapping Web Design Mistakes Which Cost Failure in Online Business

Leave a Comment
Business and marketing has been already occupied by World Wide Web and maximum small and medium establishments have made own presence in online world even large scale industries also stepped their identification via websites. 

Normally Trapping Web Design Mistakes Which Cost Failure in Online Business 


Do you know that your sidebar may cost you a lot of money? To tell the truth it’s not the only part of your web design that may make you lose some bucks. Give a look around the web and you’ll notice many silly (but common) web design mistakes. Would you go in a restaurant with a dirty frontage and some rubbish near the entry? I wouldn’t. Those things make you think that such restaurant is low quality and serves unhealthy food. A similar thing happens when you land on a bad looking blog: you classify it as low quality, and you leave as fast as light. Even if a first time visitor remains on an ugly blog, probably he won’t buy products because of the design. 

People need to know that you are reliable and professional to buy from you, but a bad web design gives a sense of unreliability. Of course, a phenomenal web design will help you to sell more products, reduce bounce rate, increase your perceived expertise and better engage your readers, but it will cost you a lot of money, and probably you don’t want to invest them until you grow your business and can afford such investment. The good new is that you don’t need a phenomenal web design, you just have to avoid 7 silly mistakes that can easily kill your business. 

1. Unprofessional Overall Look 

The first thing that you see when you land on a new blog is the overall look of the page. If it doesn’t seem good enough you will leave the site in few seconds. There are many design mistakes in this page, but I want to focus only on the overall look now. As you land on this blog, you see a white page with a quite ugly picture, a green header with a very bad text (green text on a green picture is a huge mistake!), a very flat menu and a light blue background. Would you buy from this blog? Of course not! The biggest difference in the overall look of blog comes from the theme that you use. I highly suggest you to take a premium WordPress theme instead of a free one: it’s on a completely different level in web design and seems professional. There’s a reason because all the most popular bloggers have a premium WordPress theme (and usually, they hire a designer to bring it to the next level too): it’s because premium themes are far better than free themes. I hear from many people that they don’t want to spend money on their blog. Well, it’s ok, but then I hear them complain about their poor results and I wonder “Why are you complaining? You want people to spend money on your business, but you’re the first who doesn’t spend money on it. This is hypocrisy, isn’t it?”. Your blog overall look it’s too important to neglect it. You could even choose a free WordPress themes, but in this case, you need to customize it and make it look great (with most of the free themes you’ll need to know codes or ask to someone who knows codes…but in the latter case you will spend less with a premium theme that you can customize by yourself). The overall design should look harmonious. Pay attention to details. Your background should fit well in the overall look. And follow all the next web design tips.

2. Bad Header 

The header is a key element in your web design. It can help you to get the attention of the people or it can scare your visitors and make them leave your blog. Surfing a little the web you’ll notice that most of the blogs have terrible headers. It’s probably the most undervalued element in the web design, even though it’s one of the most important part of the page. First and foremost, if you want to insert a picture or a graphic work in your header, insert a great one. A bad graphic work in your header is worse than a skunk in a sealed atomic bunker. Many people make their blog title pretty flat and sometimes even unreadable. We’re talking about your online business card, you should make it great and readable! Your title is your brand, if people can’t read it, they won’t know your brand. Your logo goes in the header too, and should be clear because, together with the title, it’s an essential part of your brand. The header gives you the chance to show first time visitors what’s your blog about. This is crucial to make people decide if they are in the right place or not. Not including a headline (that should anticipate your Unique Selling Preposition) is a mistake that may cost you lots of customers. Through the header you can even make a first attempt to connect with a first time visitor: you just have to show your picture. The header is a key to have a great overall look, and it’s also a big opportunity to hook your first time visitors, take care of it. 

3. Wrong Color Scheme 

Colors are extremely important. The unprofessional overall look of a blog is often due to a bad color scheme (other than a bad theme and a bad header). There are many case studies and scientific researches beyond colors and color schemes. It means that colors have a crucial role when it comes to design. Too many colors and your blog seems a very low level one. When you bombard your visitors with many colors you’re distracting them: they can’t focus on your message (headline, menu and blog post titles) because all the colors are taking their attention. My advice is to use 2-4 colors. Using the right scheme you could use up to 6 colors, but if you are not 100% sure about them, probably you’ll have better to insert fewer colors. Notice that the opposite color mistake is pretty common and dangerous too: flat color schemes are pretty boring. Colors should be mixed in the right ration. If your blog is too colored, it will have a bad impact on your visitors. If your blog is too white, it will be too flat. The most important concept is that you have to balance colors. Notice that you should use colors and white spaces to make people pay attention to certain parts of your blog. White spaces can be used to highlight some parts of your blog such as headline, blog post titles, your optin form or your product image. If you want to highlight something just put some white space around it, and make the object colored (or black). 

4. Overcrowded Sidebar 

How many overcrowded sidebars have you ever seen online? I guess too many. There are sidebars in some blogs that are more crowded than the main streets of Los Angeles at 5pm! The blogosphere is full of blogs with way too many ads in the sidebar. Do you know that it’s a counterproductive approach? The more items you do have in the sidebar, the fewer people are driven to click on them. Simply nothing can standout and grab the attention of a person – without mention that a sidebar full of ads makes you look spammy, and as a result your online reputation will be irreversibly damaged. The sidebar has a key role in your business. Your sidebar should accomplish one of the following three tasks, and possibly all of them: Make people subscribe to your email list Make people buy your stuff or your affiliate products Make people read more content on your blog All the other goals are not required. As a bonus task you may want people follow you on social media, but it’s not as important as the previous tasks. This doesn’t mean that you should add, your Facebook box, Twitter feeds and other social network widgets on your sidebar. Keep your sidebar clean. As a general rule you have better to keep 3-5 items in the sidebar. If you insert less items, your blog may seem empty, in the opposite scenario it will look quite messy. It means that you should choose carefully what you insert in your sidebar.

5. A Non-Obvious Overcrowded Menu 

The menu is a crucial part of your blog because the people who arrive on it for the first time need to know where to go. It should be clear and immediate. I’ve seen many blogs with non-obvious page names in it. That kind of menu doesn’t help you to decide where you should go on that blog, and this is a big problem: when people don’t know where to go on a blog, they click the back button. Try to make the page names in your menu obvious. Think like a first time visitor who doesn’t know anything about your blog, and help him to figure everything out fast. It means that you should also cut complex page names out of the menu, keep it simple. Immediacy is the key to a functional menu. Of course, a menu with too many pages isn’t immediate. You don’t people have a hard time trying to figure out what’s on your blog. Insert just the most important pages in your menu. As a general rule, have 3-6 pages in your menu and try to avoid the cascade menu. Cascade menus are quite complex, and because people can’t see every page in them, they will damage the immediacy of your menu. 

6. Too Many Ads 

Ads have the huge power of making you lose potential customers. If ads are your main monetization strategy, leave them on your blog, but if you are selling a product or a service, delete them from your blog. It’s not only because people who click on ads will leave your blog and probably will never return: it’s because ads make your blog look messy, spammy and unprofessional. Of course, you can insert them in the right way and make them look good in your design, but you have to be really good at this for doing it. The most common ads excess, as said before is in the sidebar, but it’s not the only one. There are many blogs which insert ads in the header (huge mistake!). Many bloggers insert ads in the content of their blog, with terrible results – ads in blog posts make you look really spammy. Many people even bring this kind of ads to the next level: they use text ads in their blog posts, a sure way to have messy, unreadable page (please, don’t do it!). I’m completely against ads, because they’ll make you waste more money than you could earn with them, but if you want to insert them in your blog, don’t exaggerate and try to keep an equilibrium. 

7. Unusual Page and Text Colors 

Have you ever noticed that 99,9% of the most successful bloggers use black text on a white page for their posts? It’s just because it’s the most readable content format. Forget about using strange colors for your page and/or text because you’ll only make people leave your blog without reading your content. Avoid grey both in text and page background too. Very dark grey text on a white page it’s ok, but why using it when you can make your text black? The same is true for the opposite case: black text on a very light grey could be ok, but it’s better to use black text on a white page. Your content is the most important part of your blog, you want that everyone reads it – losing some clients because of your blue text isn’t the smartest idea in the world. 

Final words from author: 

What do you think about your blog design? What would you improve in it? Leave a comment with a link on your blog and I’ll be more than happy to check it out and give you a feedback about your web design.
Read More

Website Weds Blog: Combination of blog and Website becomes Fashion

Leave a Comment
Blog and website combination has become a fashion for bloggers and webmasters now these days because multi-niche is another top rated topic for them. Today I continue my mini-series on Anatomy of a Blog Design.I had covered various foundational aspects of the blog and blogging. Today I’ll cover a topic that I know a lot of people have questions about. Should I have my main website AND a blog, or is it best to have my blog serve as both. The short answer is, there is no right or wrong. It depends. I’ll briefly cover some of the things you may consider when making that decision, then I’ll cover some effective ways you can combine your blog as both your main website and blog.

Website Weds Blog: Combination of blog and Website becomes Fashion


The first thing you should know is that nowadays, it really is no big deal at all to have a blog be your main website. In fact, many websites you frequent everyday probably are technically “blogs,” but are just designed to run and look like traditional sites. The issue of separating them was more prevalent back in the early day when blogs were primarily periodic journals, sort of like an online diary if you will. Their main function was for you to write posts that your published daily, weekly, etc. Since then blogging platforms have radically transformed. The most significant change was the ability to add static pages. This is what allowed blogs to appear more like traditional sites.

When deciding whether or not you should separate the two, here is a list of considerations:
  • How important is it for your website visitors to have a smooth, cohesive experience?
  • How closely linked are the topics of your blog to your business? (e.g. if your blog is more personal in nature, you may not want it linked to your business)
  • How much content and information do you need to be on static pages?
  • How is your main website created? Can it support having a blog incorporated?
  • How and who updates your website? Will that be the same person who updates the blog?
  • How much time do you have to maintain both?

Most of my blog readers are professional visual artists, and as such I think having a combined blog/website is a great idea. In fact, I see lots of people in this industry doing exactly that.

The Marriage of Your Blog and Website

So, let’s talk about making a combined blog/website. If you’ve gone through all the questions about and decided this is the way for you to go, here are some ideas and tips for doing it effectively.

Design: Ideally, the look and feel of your blog should flow and be completely cohesive with the rest of the site. If you’re using an actual blog as your website, this most likely won’t be an issue since the blog design will be carried throughout. But, some of you may have a website created that is not on a blog platform, then have an installed blog that is accessible from your site, keeping them consistent will be important. Unless you have a professional web designer who can code an installed blog to look like your site (and vice versa) that may be difficult to do. A great example of this implementation are my friends over at Matchstic, a brand identity house here in the Atlanta area. If you look “under the hood” of their website (i.e. “View the Source” from your browser), you can see that their main site is a custom designed site. If you click over to their blog and do the same, you can see that their blog is an installed WordPress blog (whenever you see blog/wp-content/… in a URL path, you know it’s a WordPress blog.) Their blog flows seamlessly with their rest of their site. However, hop on over to mutual friends Whitestone Motion Pictures, and you’ll see their entire site is a WordPress blog. Again, all seamlessly designed to flow together.

Home Page: The key decision you’ll want to make when having your main website strictly on a blogging platform is what will be the “Home” page. Traditionally, the home page of a blog has been the journal part. The section of the blog where your periodic posts go. When people think about blogging, that is what they envision. And when they read a blog, that is what they are referring to. If you make the “blog” part of your site the home page, you’re communicating the message that the periodic posts are the main event of your site. For many of you who are posting photos or videos from jobs you’re doing every week, that’s not a problem at all. However, if you do not have a consistent amount of content to post (and I suggest at least three blog posts a week), then it’s best to make a static page your home page. If you’re using WordPress this is easy. In the left-hand side of your Dashboard go down to Setting -> Reading. Set “Front Page Displays” to “A Static Page.” Then from the drop down menus beneath, select which page you want as your home page, and which page you want to be the page where your periodic blog entries will go. See example below


If you are going to have a traditional “blog” section that is not the home page, you need to actually create the page. In this case, the page I created was called “Journal.” Just create the page, give it a title, and leave it blank. Save it then select it as the “Posts page” in the drop down. When people go to the “page,” it won’t be a page at all, it’ll be your blog posts. This is how I did it for the Teen Identity Network (teenidentity.net/blog). This is aWordPress.com site (with teenidentity.net mapped to teenidentity.wordpress.com) and “blog” set as the posts page.

Widgets and What-nots. From a design perspective, you may also want to consider whether or not to have a lot (or any) widgets in your side bar. This gives a site a very “blog-like” feel. If you’ve built your site on a blogging platform, but what to make it look and feel like a “regular” website, then don’t have those widgets. Some WordPress themes may give you the flexibility to control what your homepage looks like, especially if you have an installed WordPress blog where you can control over coding.

Separation of Blog and Website

I won’t say much about keeping your two sites separate except that if you do, make sure you keep them both adequately updated. It can get easy for you to neglect one for the other. If you’ve decided that it’s important to have both a blog and a separate website, then keep them up to date. I have chosen to keep the two separated because my blog is more of a personal project meant as an extension of my personal and professional brand, not an extension of my company Dare Dreamer Media. Naturally I’ll use it to showcase work I do, but it’s so much more than just a showcase site. This is actually not an uncommon way to go about blogging. One of my favorite blogs is Michael Hyatt’s, Chairman and former CEO of Thomas Nelson Publishing. His blog is not an offshoot of Thomas Nelson, it’s entirely based on Michael’s role as a leadership trainer, mentor, etc. Depending on your role in your company, your blog may be the same. As I have designed for my company website cum blog at Focusa2z Connects World (www.focusa2z.com ). 

Share in the comments how you’ve used a combined blog/website, or why you keep them separate if you do. Don't hesitate to put your words! 
Read More
Next PostNewer Posts Previous PostOlder Posts Home