Like many web professionals, I’m so busy doing things for clients that it’s true to say that my own site often suffers thanks to a lack of time. One thing that I have been meaning to do for some time is move the site, which is a WordPress site, to another server, as I’m not overly happy with my current hosts.
However, it’s one of those things that I’ve put off doing because it does just seem like a lot of hassle, especially since my theme is bespoke and therefore any issues and it will take time to do again (yes, a simple backup will take care of this, I know).
Bearing all of that in mind, I can imagine that many people have the same problem, or have no idea where to start, so here you will find instructions on how to carry this out, without losing theme elements or ending up with a site full of broken links.
Keeping the same URL
Firstly, it’s worth noting that if you haven’t really optimized the site and intend on keeping all of the URLs, and the domain name and the database is going to remain the same, then it’s a simple process.
define('DB_NAME', 'user_wrdp1');
define('DB_USER', 'user_wrdp1');
define('DB_PASSWORD', 'password');
If this is the case, then you will just have to copy the files and database across to the new server. If you want to change the name or user of the database you will have to alter the edit.wp-config.php file to ensure that it has the right values. Locate the following in the root folder and alter accordingly.
If you’re changing server but keeping your domain name, then you will need to edit wp-config with your new database and user details and then just upload all of your files to the new server.
It’s pretty obvious too, but bears repeating, that you should make a full backup of the site, which should include the following:
Plugins
Theme files
Any uploads that you’ve made
The database
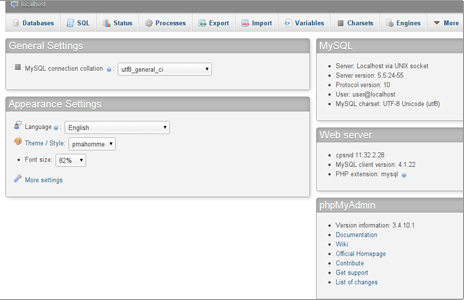
To do this, you can use phpMyAdmin, which is an open source tool for managing MySQL databases and includes a wealth of useful tools. You can choose to export data in a number of formats, such as CSV, SQL, XML, PDF, ISO/IEC 26300 and others. Alternatively, you can use a plugin such as WP-DB-Backup.
Uploading from local to a remote installation
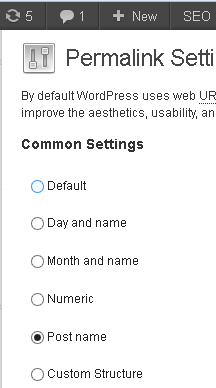
Once you’re fully backed up and ready to go, first of all you’ll need to disable Permalinks. This can be done in the “Permalinks” screen view which is in the “Settings” menu. Choose the default setting and hit save.
Then, if you haven’t already, backup the database, make a copy and rename it.
Installing WordPress on the new server
Install WordPress as you normally would, either using FTP or through cPanel and then copy all of the files from your local wp-content file to the one on the server using FTP or SFTP. Next, you will need to edit the database in order to replace the local URL with the remote one.
For this, use a search and replace utility, preferably not a text editor and change every instance of the local URL to the remote one. You can use SEARCH REPLACE DB for this, which should be installed in the root folder of your WP install for best results. In order to protect the script from abuse, it’s best to rename it before doing anything else.
For example, if you rename it newinstall.php, you will then go to http://yoursite.com/newinstall.php and follow the on-screen instructions to carry out search and replace. Once you’ve finished doing this, it’s important that you also delete the script in order to secure the DB.
Save the database before continuing. If a new database has been created when you installed WP, then this will need to be deleted. You can do this by:
Using phpMyAdmin, click on the “Structure” tab
Underneath the list of tables click on “Check All”
Choose “Drop” from the menu called “with selected”
Choose “Yes” when the message pops up asking if you want to drop all tables
Re-enable your permalinks as you had them in the last installation
You’re good to go.
Moving from host to host
If you’re moving the site to a new host, it’s exactly the same as when you upload from a local server, with one key difference being that you will have to download all of your files from the existing host using FTP.
Changing the URL
update_option('siteurl','http://www.new-site-address.com');update_option('home','http://www.new-site-address.com');
If you need to change the URL of the site as it’s in a subdirectory or it’s a new domain name, you can do this by adding some lines to the functions.php file of the theme, as below.
Then, load the new files onto the site and it should work fine. Don’t attempt to just copy all of the files and database over, as this won’t work properly and you’ll end up with broken links.
Once you’ve then loaded the new files, test and delete the lines from the functions.php files, as your new settings will now be stored and saved in the database.
If you need to set up 301 redirects, which is important to both search engines and users, then you’ll need to connect to the old site and edit the .htaccess file. Locate the file and then paste this code at the top of the file:
1 #Options +FollowSymLinks
2 RewriteEngine on
3 RewriteRule ^(.*)$ http://yoursite.com $1 [R=301,L]
Once you’ve done this, go back to the new site and test to ensure that the changes have been made successfully. It’s also a good idea to submit the change of URL to Google via Webmaster Tools and you will also need to verify it.
Finally, once you’re confident that all is working well and you’ve checked and tested, remember to tell the site users about the change. You can do this in whatever way you think will be the most effective, by newsletter, blog post or on social media and if you still own the old domain, you can set up a temporary redirect to catch any that initially fall through the net.
That’s it, all you need to do to change the location of your WP site, even if you’re using a new URL.