Still Professional Bloggers Can Earn $100 A Day Via Google AdSense

Leave a Comment
Earning $100, $200 or even $300 per day with Google AdSense can be done from a home office. Many website owners are doing it. The only thing you need is planning, work, determination, and passion about your topic or niche.

Term Definitions   

Before diving into the exact process, here's some terminology for better understanding of Google AdSense.

AdSense: AdSense is when you place Google Ads on your website, and when a visitor from your website clicks on an ads, Google pays you 68% of what the advertiser pays them. It's free to sign up.

CTR: Your ad Click-Through Rate is the number of ad clicks divided by the number of individual ad impressions. Suppose you are showing 3 AdSense ads on every page of your website, 1 page view is equal to 3 ad impressions.

CTR = Clicks / Ad Impressions X 100

Suppose, you get 5 clicks out of 500 ad impressions, your CTR would be 1% (5/500X100).
CPC: Cost Per Click is the revenue you earn each time a visitor clicks on your ad. CPC is determined by the advertisers. In some competitive niches like finance, marketing, online products etc. advertisers may be willing to pay more per click than others.

CPM: CPM means “Cost Per 1000 Impressions.”

Sometimes advertisers opt for CPM ads instead of CPC and set their price for 1000 ad impressions. And they pay each time their ads appear on any website.

What It Takes To Make $100 A Day With AdSense

When your CTR is 1% and your average CPC is $0.25. it’s quite achievable to make $100 dollars a day, and lots of people are doing it. Let's assume that a Page View = An Ad Impression. 
  • To make $100 everyday you need 40,000 Page Views/day Or, 400 Clicks a day @ 1% CTR and $0.25 CPC. For 40,000 Page Views you have to produce 500 awesome articles on your website. These pages must attract at least 80 or more page views everyday. 

    These articles can be as little as 300 words. Always include a YouTube video on every article page you create. Many people writing a book, can simply write their book on their website and make money simply by writing it. You can also get your visitors to contribute their story ideas. This gets you free content and engages your followers. 
  • Apart from CPC, you will also earn from your CPM ad impressions. Irrespective of any niche, the average CPM earning is $1 to $1.5 per 1,000 impressions. You can make $40 to $60 per day from 40,000 page views.
  • You can also sell your Ad space directly or via BuySellAds.com, and generate $6,000 Per Month on an average from 40,000 page views. Check out how webmasters are making $6,000 to $8,000 Per Month from BuySellAds with forty thousand page views per day. So your daily earning will be $200 (6000/30=200).
  • A niche website with high quality articles works well with affiliate marketing. You can might be able to earn $40 to $80/day from affiliate selling with correct implementation and execution.
Now your total earning per day is $100 + $40 + $200 +$40 = $380 from CPC, CPM, Direct Ad Sell, Affiliate Marketing for 40,000 page views per day. I’ve taken the lowest possible earnings from all the 4 sources.

$380 per day means $11,400 per month (380X30= 11,400) Or, $136,800 per year (11,400X12=136,800). 

When deciding to be in the 'Creating Content Business' your desired earning of $100 per day from Google AdSense is achievable. 1,000s of people are making money by writing articles, and you can do it too, when you are Focused!
Where do I paste AdSense code in Blogger?
Blogger
  • Copy the serving code of the zone or a specific ad.
  • Go to the dashboard of your blog.
  • Click "Layout" tab to edit it.
  • Click "Add a Gadget" (either on the side or at the bottom)
  • Under the Basics list, choose the HTML/JavaScript.
  • Paste the serving code to the Content box, and click Save.

What to do if AdSense isn't turning on
  1. Sign in to Blogger.
  2. In the top left, click the Down arrow .
  3. On the Blogger dashboard, click the blog you want to put AdSense ads on.
  4. In the left menu, select Layout.
  5. Under the AdSense gadget, click Edit.
  6. Click Save.
  7. Repeat Steps 4 and 5 for every AdSense gadget on your blog.

P.S. The above results can be possible if you produce at least 200 to 250 great articles or blog posts per year for 2 years. So how much traffic you actually need to make $100 per day from Google AdSense – It’s way less than 40,000 Page Views Per Day!
Read More

I had Quited Professional Blogging but Still I Am Writing As Guest Blogger but Why?

2 comments
Why is that around 90% of people quit blogging within a few months of starting? Blogging can be a very lucrative way of making money while enjoying yourself, yet only around 10% of those who start actually succeed in making more than just a few dollars. In fact, some make nothing at all!


Why is this? Here are some of the more common reasons for newbie bloggers to give up before they have given themselves a chance to become successful. There are generally two major reasons: they are too impatient and they go about it the wrong way. There are no tricks to become a successful professional blogger – just patience and doing things correctly and in the right order.

1. Impatience is Not a Virtue!

Unless you are extremely lucky, it takes time to make money online. Sure, you will read about those claiming to have become millionaires overnight – “just purchase my system and you can too!” They are misleading you – it just doesn’t happen.

Whether you are selling affiliate products on a regular website, promoting your own products or blogging professionally, you will not become successful overnight. It takes time and patience! To make money you need a following: a good readership. It can take a few months to build up a consistent flow of regular readers, providing the traffic that will eventually be the source of your income.

If you keep writing good content, interesting blog posts that provide information and solve a few problems, then you will begin to be noticed. By monetizing your blog immediately people will think you are only trying to make money from them and not offering them valuable content. Be patient; leave it for 3 months or so before trying to monetize your blog, or at least until you have a good regular readership that leaves comments and becomes involved.

2. Lack of Motivation

Many bloggers lose their motivation after a few weeks. It’s not easy to keep writing interesting information week after week and only getting a few visitors. Many people give up because they lose heart. It takes time to build up a strong following. This will usually begin as a dribble – one or two people noticing your blog, then a few more, then it turns into a small steam.A few readers mention your blog to others on a forum and

A few readers mention your blog to others on a forum and eventually, you wake up one morning and the stream has begun. If you stay motivated, and keep writing good useful content, you will eventually have enough regular readers to consider offering a few ads and you might even review one or two products.

3. Love Writing and Love Your Niche

Your passion for your niche will show up in your writing. If you don’t like writing then don’t run a blog – unless you have somebody to write your posts for you. It is okay to use a blog post ghostwriter, but your knowledge and passion must still shine through no matter who does the writing! Your blog will be judged on its content.

Do not be too restrictive in your topics: write on many different aspects of your niche. You have many readers to keep interested, and they are not all interested in on-page SEO. Some might prefer off-page SEO, others link building and yet others be more interested in the black hat SEO methods. Be eclectic in your writing.

4. Be Unique!

The last thing a good blogger should do is trawl other blogs and copy what they are writing. You must be unique in what you write. This is not always possible, of course, but you can keep your readers coming back for more by reading yourself as one of them.

For example, if you are writing about SEO then it is difficult to be unique about the Google algorithm updates that every other professional blogger will be writing about. However, if you can find a fresh outlook on the subject that you were once looking for, then that can help you.

If most bloggers are focusing on the benefits of Google’s new Hummingbird algorithm, perhaps you could point out a few negative aspects and what your readers could do to avoid these. Very few things are 100% positive, so by looking at the negatives, you could provide your readers with very useful information that most others have missed.

5. Content is Important!

Avoid writing drivel and treating your readers like idiots. They are likely intelligent and interested people, seeking answers to their questions and solutions to their problems. If their niche involves money rather than their hobby, then they will be seeking guidance from you as to how they can make money themselves. If you can’t make money, then how can you teach them how to do so?

Readers can spot poor information and scraped content a mile away. Poor information is that which is already well-known online and scraped content is software-generated from other online content. Each of these can be easily spotted. So don’t copy content from other blogs or articles, but write your own based on your own personal knowledge. That is what people want – give them what they want and they will respect you and your blog. Readers can spot honesty in writing, believe it or not!

6. Think Language!

An important issue regarding language is that bloggers from non-English speaking countries may experience problems getting high rankings in the USA, Europe, and Australasia. This is a very large potential readership and client base to be excluded from.

In such cases, it might pay to have your blog content written for you by a professional writer. Alternatively, you could use a translation service the other way – to have your blog translated from your language to English. Many people quit blogging because they cannot participate in the English-speaking market.

7. How to Promote Your Blog

An important reason why people quit blogging is that they cannot promote their blog effectively. They might rely totally on SEO and hope to get their blog listed on Page #1 on Google. Yes, that might work after a few months or years, but what makes you think that your blog is amongst the top 10 in the world for your niche?

Here are some questions for you to answer:
Is your site registered with Google Webmaster Tools?
Do you have a professional-looking Facebook business page for your blog?
Do you have a Google+ page with +1 chicklets on each post?
Do you have a Twitter account?
Do you have a LinkdIn account with connections to others in your niche?
Are you using Pinterest to your advantage?
Have you made a video and published it on YouTube – all you need is a simple webcam!
Do you publish your articles in PDF format, or even published an eBook on PDF directories?
Do you take part in forums, and attach your forum name to your Google+ Profile?

Each of these should include a link somewhere to your blog. Remember why most people quit blogging because of a lack of traffic? Then each one of these can get you the traffic you need to be successful.

8. Guest Blogging

The best way to promote your blog is to get readers from other blogs. Make a list of other professional blogs in your niche and ask if you can guest blog for them. You are unlikely to be accepted immediately. You must first make intelligent comments in these blogs, perhaps solve some problems and in general, show that you are an expert. You might then get an invitation to guest blog, but if not then why not ask? You get nowhere if you never try!

Why Most People Quit Blogging: Conclusions

Most people quit blogging because:
They have no patience
They lose motivation
They have a ‘me too’ mentality, rather than be unique
They cannot write interesting content
They cannot promote their blog

You will never be a successful professional blogger if you are too shy to ask: ask people to follow your blog, ask if you can guest blog and ask readers what they want to read.

Don’t Quit Blogging

Be pushy, find new ways to keep your readers happy and make sure as far as you possibly can that new reader are constantly being exposed to your blog. Then you will have a good chance of achieving success as a professional blogger.

To run a successful blog is a dream for many. And it’s no wonder: the benefits can be huge. You can make money through the traffic you receive and affiliate marketing, fortify your social media presence and enhance your brand awareness- whether that brand is you or your company.

To become a successful blogger, however, requires hard work and determination. You can’t simply start a blog and hope for the best. In order to thrive as a blogger, you’ll have to consistently publish quality content that stands out, solves problems, entertains and attracts an audience that keeps coming back for more.
Read More

403 Forbidden Error: Instantly Fix Issues on Wordpress Blog and Website

Leave a Comment
Did you just try to access your WordPress site only to be hit by some message telling you something is “Forbidden” or that you don’t have permission to access something on your site? If so, you’ve likely run into the 403 Forbidden error on WordPress.
Seeing an error on your WordPress site can be frustrating and deflating, which is why we’ve created this detailed guide to help you fix the 403 Forbidden Error on WordPress and get your site functioning again as quickly as possible.
Let’s get started without any further introduction because we’re sure you just want to fix your site!
  • What is the 403 Forbidden error
  • How to fix the 403 Forbidden error
  • What is the 403 Forbidden Error?

    Like many other common WordPress errors, the 403 Forbidden error is an HTTP status code that a web server uses to communicate with your web browser.
    403 forbidden error in Chrome403 forbidden error in Chrome
    Quick background on HTTP status codes – whenever you connect to a website with your browser, the web server responds with something called an HTTP header. Usually, this all happens behind the scenes because everything is working normally (that’s a 200 status code, in case you were wondering).
    However, if something goes wrong, the server will respond back with a different numbered HTTP status code. While these numbers are frustrating to encounter, they’re actually quite important because they help you diagnose exactly what’s going wrong on your site.
    The 403 Forbidden error means that your web server understands the request that the client (i.e. your browser) is making, but the server will not fulfill it.
    In more human-friendly terms, it basically means that your server knows exactly what you want to do, it just won’t let you do it because you don’t have the proper permissions for some reason. It’s kind of like you’re trying to get into a private event, but your name got accidentally removed from the guestlist for some reason.
    Other HTTP status codes mean different things. We’ve written guides on fixing issues with 404 not found errors, 500 internal server errors, 502 bad gateway errors, and 504 gateway timeout errors.

    What Causes the 403 Forbidden Error on WordPress?

    The two most likely causes of the 403 Forbidden Error on WordPress are:
    1. Corrupt .htaccess file
    2. Incorrect file permissions
    It’s also possible that you’re seeing the error because of an issue with a plugin that you’re using at your site. In this article, we’ll show you how to troubleshoot all of these potential issues.

    403 Forbidden Error Variations

    Like many other HTTP status codes, there are a lot of different variations for how this error code presents itself.
    Here are some common variations that you might come across:
    • “Forbidden – You don’t have permission to access / on this server”
    • “403 – Forbidden: Access is denied”
    • “Error 403 – Forbidden”
    • “403 – Forbidden Error – You are not allowed to access this address”
    • “403 Forbidden – nginx”
    • “HTTP Error 403 – Forbidden – You do not have permission to access the document or program you requested”
    • “403 Forbidden – Access to this resource on the server is denied”
    • “403. That’s an error. Your client does not have permission to get URL / from this server”
    • “You are not authorized to view this page”
    • “It appears you don’t have permission to access this page.”
    If you’re on an Nginx server, it will look like this below. Basically, if you see any mention of “forbidden” or “not allowed to access”, you’re probably dealing with a 403 Forbidden error.
    What the 403 Forbidden Error looks like at KinstaWhat the 403 Forbidden Error looks like at Kinsta

    How to Fix 403 Forbidden Error on WordPress

    To help you fix the 403 Forbidden Error on your WordPress site, we’ll cover five separate troubleshooting steps in detail:
    • File permissions
    • .htaccess file
    • Plugin issues
    • CDN issues
    • Hotlink protection

    1. File Permissions

    Each folder and file on your WordPress site’s server has its own unique file permissions that control who can:
    • Read – see the data in the file/view the contents of a folder.
    • Write – modify the file/add or delete files inside a folder
    • Execute – run the file and/or execute it as a script/access a folder and perform functions and commands.
    These permissions are indicated by a 3-digit number, with each digit indicating the level of permission for each of the 3 categories above.
    Normally, these permissions just “work” for your WordPress site. However, if something gets messed up with the file permissions at your WordPress site, it can cause the 403 Forbidden error.
    To view and modify your site’s file permissions, you’ll need to connect via FTP/SFTP. Here’s how to use SFTP if you’re hosting at Kinsta.
    For the screenshots in the tutorial below, we’ll be using the free FileZilla FTP program. The basic principles will apply to any FTP program, though – you’ll just need to apply them to a different interface.
    Once you’re connected to your server, you can view a file or folder’s permissions by right-clicking on it:
    View file permissions in FileZillaView file permissions in FileZilla
    Of course, manually checking the permissions for each file or folder isn’t really an option. Instead, you can automatically apply file permissions to all the files or folders inside of a folder.
    According to the WordPress Codex, the ideal file permissions for WordPress are:
    • Files  – 644 or 640
    • Directories – 755 or 750
    One exception is that your wp-config.php file should be 440 or 400.
    To set these permissions, right-click on the folder that contains your WordPress site (the folder name is public at Kinsta). Then, choose File Attributes:
    Bulk edit file permissions in FileZillaBulk edit file permissions in FileZilla
    Enter 755 or 750 in the Numeric value box. Then, choose Recurse into subdirectories and Apply to directories only:
    File permissions for WordPress directoriesFile permissions for WordPress directories
    Once you’ve applied the correct permissions for directories, you’ll repeat the process for files. Only this time:
    • Enter 644 or 640 in the Numeric value box
    • Choose Recurse into subdirectories
    • Choose Apply to files only
    File permissions for WordPress filesFile permissions for WordPress files
    To finish the process, you just need to manually adjust the permissions for your wp-config.php file to make them 440 or 400:
    File permissions for wp-config.php fileFile permissions for wp-config.php file
    If file permissions issues were causing the 403 Forbidden Error, your site should now start working again.

    2. .htaccess File

    Kinsta uses the NGINX web server, so this potential issue doesn’t apply if you’re hosting your site at Kinsta because Kinsta sites do not have a .htaccess file.
    However, if you’re hosting elsewhere and your host uses the Apache web server, one common cause of the 403 Forbidden error is a problem in your site’s .htaccess file.
    The .htaccess file is a basic configuration file used by the Apache web server. You can use it to set up redirects, restrict access to all or some of your site, etc.
    Because it’s so powerful, even if a little mistake can cause a big issue, like the 403 Forbidden error.
    Rather than trying to troubleshoot the .htaccess file itself, a simpler solution is to just force WordPress to generate a new, clean .htaccess file.
    To do that:
    • Connect to your server via FTP
    • Find the .htaccess file in your root folder
    • Download a copy of the file to your computer (it’s always a good idea to have a backup just in case)
    • Delete the .htaccess file from your server after you have a safe backup copy on your local computer
    Delete the .htaccess fileDelete the .htaccess file
    Now, you should be able to access your WordPress site if your .htaccess file was the issue.
    To force WordPress to generate a new, clean .htaccess file:
    • Go to Settings → Permalinks in your WordPress dashboard
    • Click Save Changes at the bottom of the page (you do not need to make any changes – just click the button)
    How to generate a new, clean .htaccess fileHow to generate a new, clean .htaccess file
    And that’s it – WordPress will now generate a new .htaccess file for you.

    3. Deactivate and then Reactivate Your Plugins

    If neither your site’s file permissions nor .htaccess file are the problems, the next place to look is your plugins. It could be a bug in a plugin or a compatibility issue between different plugins.
    No matter what the issue is, the easiest way to find the problematic plugin is with a little trial and error. Specifically, you’ll need to deactivate all of your plugins and then reactivate them one by one until you find the culprit.
    If you can still access your WordPress dashboard, you can perform this process from the normal Plugins area.
    If you cannot access your WordPress dashboard, you’ll instead need to connect to your WordPress site’s server via FTP/SFTP (here’s how to connect via SFTP at Kinsta).
    Once you’re connected to your server via FTP:
    1. Browse to the wp-content folder
    2. Find the plugins folder inside of the wp-content folder
    3. Right-click on the plugins folder and choose Rename
    4. Change the name of the folder. You can name it anything different, but we recommend something like plugins-disabled to make it easy to remember.
    Rename the plugins folderRename the plugins folder
    By renaming the folder, you’ve effectively disabled all the plugins at your site.
    Now, try accessing your site again. If your site is working, you know that one of your plugins is causing the 403 Forbidden error.
    To find the culprit, reactivate your plugins one-by-one until you find which plugin is causing the issue.
    After changing the file name of the plugins folder, you should see a number of errors that say plugin file does not exist when you go to the Plugins area on your site:
    What happens after renaming the plugins folderWhat happens after renaming the plugins folder
    To fix this issue and regain the ability to manage your plugins, use your FTP program to change the name of the folder back to plugins. So, if you renamed it to plugins-disabled, just change it back to plugins.
    Once you do that, you’ll see the full list of all your plugins again. Only now, they’ll all be deactivated:
    Reactivate your plugins one by oneReactivate your plugins one by one
    Use the Activate button to reactivate them one-by-one.
    Once you find the plugin that’s causing the issue, you can either reach out to the plugin’s developer for help or choose an alternate plugin that accomplishes the same thing (we’ve collected the best WordPress plugins here).

    4. Deactivate CDN Temporarily

    If you’re getting 403 forbidden errors on your assets (images, JavaScript, CSS), it could be a problem with your content delivery network (CDN). In this case, we recommend temporarily disabling your CDN and then checking your site to see if it works. If you’re a Kinsta client, click into your site and then on the “CDN” tab. Click the “Disable CDN” button.
    Disable CDNDisable CDN

    5. Check to See If Hotlink Protection Is Misconfigured

    Hotlinking is when someone adds an image to their site, but the hosted link is still pointed to someone else’s site. To prevent this, some will set up what is called “hotlink protection” with their WordPress host or CDN provider.
    When hotlink protection is enabled, it will typically return a 403 forbidden error. This is normal. However, if you’re seeing a 403 forbidden error on something you shouldn’t be, check to make sure hotlink protection is configured properly.

    Still Having Issues? Reach Out to Your Hosting Provider

    If none of the above solutions worked for you, then we recommend reaching out to your hosting provider. They can most likely help you pinpoint the issue and get you back up and running. If you’re a Kinsta client, open up a support ticket with our team. We are available 24/7.

    Summary

    The 403 Forbidden error means that your server is working, but you no longer have permission to view all or some of your site for some reason.
    The two most likely causes of this error are issues with your WordPress site’s file permissions or .htaccess file. Beyond that, some plugin issues might also cause the 403 Forbidden error. Or it could be that something is misconfigured with hotlink protection or your CDN.
    By following the troubleshooting steps in this guide, you should be able to get your site back to working in no time.
Read More

Beginner’s Guide for 2020: An Easy Free Step-By-Step Beginner’s Guide To Create A Blog

Leave a Comment
Are you looking for a free, easy, step-by-step guide on how to start a blog? My free guide on this page will show you how to create a blog that is beautiful and functional, all in an easy step-by-step tutorial 


I know that starting a blog can seem overwhelming and intimidating. This free guide is all about blogging for beginners, and will teach you how to be a blogger with just the most basic computer skills. So whether you’re 8 or 88, you can create your own blog in less than 20 minutes.
I am not ashamed to admit that when I was first learning how to build a blog I made a ton of mistakes. You can benefit from more than a decade of my experience so that you don’t repeat these same mistakes when you make your own blog. I created this free guide so that anyone can learn how to blog quickly and easily. And if you get stuck at any point, please send me a message and I will do my best to help you!
Skip the rest of this introduction and start building your blog!

What is a blog anyway?

In short, a blog is a type of website that focuses mainly on written content, also known as blog posts. In popular culture we most often hear about news blogs or celebrity blog sites, but as you’ll see in this guide, you can start a successful blog on just about any topic imaginable.
Bloggers often write from a personal perspective that allows them to connect directly with their readers. In addition, most blogs also have a “comments” section where readers can correspond with the blogger. Interacting with your readers in the comments section helps to further the connection between the blogger and the reader.
This direct connection to the reader is one of the main benefits of starting a blog. This connection allows you to interact and share ideas with other like-minded people. It also allows you to build trust with your readers. Having the trust and loyalty of your readers also opens up the door to making money from your blog, which is something I discuss later in this guide.

Should you start a blog?

Simple steps to help you create a blog easily


One of the misconceptions about starting a blog is that you need to be a great writer to be successful. Nothing could be further from the truth. People read blog sites to get a personal perspective on things, so most bloggers write in a very informal and conversational style.

In addition, you don’t need to be an expert on your topic in order to have a successful blog. For example, readers of a cooking blog don’t want to read a textbook from a food scientist, they want to hear the experiences of someone who has actually cooked some real meals, mistakes and all.
To be successful as a blogger there is really just one requirement: a passion for your topic.
At its heart, blogging is about sharing your knowledge with the world. Choosing a topic that you are passionate about makes the process of starting a successful blog so much easier. Writing about more than one topic is totally fine too. As long as you are writing about things that you are genuinely interested in, your passion will shine through and keep your readers interested.
So why would you go to the trouble of blogging? There are a few reasons:
  • Make money from home. Blogging can be quite lucrative if done correctly. The top bloggers in the world obviously earn quite a bit, but even a part-time blogger can expect to make a nice profit if things are done correctly. The best part about it is that blogging is a form of passive income, since you can spend just a few hours a week writing a blog post and then continue to make money from it long after the blog post is written. I go into much more detail on how to blog for money later in this guide.
  • Share your story. A blog allows you to have a voice and be heard. You can share your story with the entire world if you so choose. One of the most common ways blogs are used are as a diary where the blogger writes about their daily experiences so that friends, family, and others can all be a part of their lives.
  • Recognition for yourself or your business. No, you probably won’t have paparazzi following you around because of your latest blog post. But a successful blog makes your idea into a reality, and can gain you a ton of recognition in your respective field. Many bloggers are known as experts just because of their blogs, and some have even gotten book and movie deals based on their blogs.
  • Find a community. Blogging at its heart is interactive. You write a blog post and people comment on it. This is a great way to connect with people who are interested in the same things as you are. Blogging allows you to teach these people based on your experience, and it gives you the opportunity to learn from your readers as well.
The good news is that the internet is exploding with growth right now. More people than ever are online. This explosion in growth means more potential readers for your blog. In short, if you are thinking about starting a blog then there is no better time than right now.
So, just how do you start a blog?

How to Start a Blog in 6 Steps

Learn how to create a blog in about 20 minutes following these steps:
  1. Pick a blog name. Choose something descriptive.
  2. Get your blog online. Register your blog and get hosting.
  3. Customize your blog. Choose a free template and tweak it.
  4. Write & publish your first post. The fun part!
  5. Promote your blog. Get more people to read your blog.
  6. Make money blogging. Choose from several options to monetize your blog.
Let’s start your blog!

Step 1: Pick a blog name

The first step to finding a good blog name is choosing your topic.
If you’re not sure what to blog about, there are a few ways to find a good blog topic:
  • Hobbies & passions. Hobbies or other interests you are passionate about are a great place to start. Cooking, travel, fashion, sports, and cars are all classic examples. But even blogs about more obscure hobbies can be successful, since the your audience is literally anyone in the world with the internet.
  • Life experiences. Everyone has lessons they have learned through life experience. Sharing this knowledge can be incredibly helpful to others in similar situations. For example, I recently helped a woman start her blog about being a fireman’s wife. She has a lot of experience and knowledge to share with others about this topic, and it has helped her connect with others in similar situations.Think about the things you have experienced in life. This could be related to your family (example: a blog about being a stay at home mom), work (a blog about experiences dealing with clients), or other life experiences (a blog about dealing with a troubling time such as a disease or divorce, or about a happy time such as preparing for a wedding or a birth of a child).
  • A personal blog. A personal blog is a blog all about you. This will include a variety of topics, from things you do on a daily basis, to random thoughts and musings. This is a great way to share you thoughts with the world without having to stick to just one topic.
Once you have a topic it’s time to choose your blog name.
A good blog name should be descriptive so that potential readers can instantly tell what your blog is about just from the name.
If you are blogging about one specific topic then you will definitely want to include that in some way in your blog name. Try not to get hung-up on just one word though. For example, a cooking blog doesn’t necessarily have to have the word “cooking” in it. The words “food”, “recipes”, and “meals” would also let people know that your blog is about cooking.
If you are planning to create a personal blog where you discuss a variety of topics then I recommend using your name, or some variation of it, since your blog is all about you. For example, I own the blog scottchow.com. You can also add your middle name or middle initial if you find your name is already taken. Or you could use a variation like “Scott Chow Blog” or “Blogging with Scott”.
Can’t decide on a good name for your blog? Contact me and I will help you personally (for free)!
Once you have some blog name ideas you will need to choose a domain extension.
A .com domain extension is the most preferred, but .net or .org work as well. It is also important to note that for the purposes of a blog domain you cannot have any spaces between words. So “Blogging with Scott” becomes bloggingwithscott.com

Now that you’ve got your name and have picked an extension it’s time to make sure that no one else has already registered the same name:
Note: You cannot use any spaces or punctuation other than dashes in a domain name.
If you find that the name you wanted is already taken there are a few things you can do:
  • Try a different domain extension. If the .com version is already registered you may still be able to get the .net or .org version of your blog name.
  • Add small words. Words like “a”, “my”, or “the”. For example, this site is called TheBlogStarter.com instead of BlogStarter.com.
  • Add dashes between words. For example, scott-chow.com

Step 2: Get your blog online

Now that you’ve got a name picked out it’s time to get your blog online. This might sound hard or technical, but the steps below will walk you right through and make the process easy.
To get your blog up and running you need two things: blog hosting and blogging software. The good news is that these typically come packaged together.
A blog host is a company that stores all of the files for your blog and delivers them to the user when they type in your blog name. You must have a blog host in order to have a blog.
You also need to have the software to build your blog. In this guide I will be showing you how to build a blog using the WordPress blogging software, because it is the most popular, customizable, and easiest to use.
So, we made it. Phew. Better late than never! So, without further ado, let’s jump into step 1.

Step 1 – Choose your preferred blogging platform

Choosing where you want to build blog is pretty much the first thing you have to do. I’m going to take a leap and assume you’ve heard of WordPress, and this is the platform I advocate. It’s massive.
It’s by far one of the biggest blogging platforms in the world, with countless plugins and add-ons and almost infinite ways to design and layout your blog.
There are more than 82 million active users of WordPress = a lot, basically.
wordpress
There are other alternatives, however, and they are listed below:
  • Blogger – Definitely the next best thing to WordPress.
  • Tumblr – Half social network, half blog. Interesting, and very simple to use.
Even though WordPress is bigger (and probably better) than those two, here are my reasons why you should still go with WordPress:
  1. Super easy set-up and is free to use
  2. Tons of free themes and layouts (I’m not kidding, there are gazillions).
  3. There’s a massive support forum in case you get stuck (you won’t, but it’s nice to have it there if you need it).
  4. Your blog will be insanely fast and it’ll also look Functionality and form – perfect!
  5. People can interact with you easily. Your content can be shared, commented on, and so on.
Here’s an article about different blogging platforms (including WordPress), give it a read:
Now, Step 2 (see, we’re moving fast now!)

Step 2 – Self-hosting or a free alternative?

Whoa, slow down there! This is the biggest decision you’ll have to make before we go any further. You need to decide whether to pay for your blog or grab a free one.
WordPress, Tumblr, and Blogger all offer free blogs for anyone. Awesome, right? It’s perfect for those of us who aren’t super serious about blogging. But it does have downsides:
1) You won’t be able to get your OWN domain name
On a free blog, your blog’s web address (your URL) will be butt-ugly. Like, really ugly. In short, create a free blog with any other the above free blog services and it’ll look like this:
  • yourblog.wordpress.com
  • yourblog.blogspot.com
  • yourblog.tumblr.com
I know, ugly right?
2) Limits and more limits
There are some limits to free blogs. You can’t fully monetize it, and you don’t have the possibility to upload all those videos and images you want to show everyone – it’s all limited. Worse still, you won’t even have access to the free themes offered by WordPress.
3) You DON’T OWN your blog
It might sound silly at first, but you don’t actually own your blog. It’s hosted on someone else’s web property and they can delete it if they want to. They have done so in the past, and keep doing it in the future. Which means all your hard work on your blog, all those countless hours of writing blog posts might have vanished within seconds. Sad…
On the other hand, with a self-hosted blog on your own domain name – you are the REAL owner of your blog. You’ll be able to name your blog whatever you want, for example, “YourName.com” or “YourAwesomeBlog.com. You can end it with .com, .co.uk, .net, .org, or virtually any other web suffix. Add to that unlimited bandwidth for videos, images, and content plus the free themes and you have a winning combo.
So how much is hosting and a domain name? Not as much as you’re thinking, fortunately. It usually works out to about $5 to $10 per month, depending on your hosting provider which is less than a couple of coffees.
If you still have questions, here’s some further information for you to look at:
  • Should I Choose a Hosted or Non-hosted Blogging Platform?

Step 3 – Start a blog on your own domain (if you chose self-hosting and a custom domain)

wordpress blogging platform
I’m going to push ahead based on the premise you’ve chosen WordPress, and if you haven’t, you should. Seriously, it’s the best.
If you’re still a little confused by what a self-hosted blog is, allow me to explain and how you can go about setting one up for yourself.
You’ll need to come up with a domain name you like and also choose a hosting company that can host your blog.
  • Domain: The domain is basically the URL of your website. Examples: google.com (Google.com is the domain), Facebook.com (Facebook.com is the domain). See? Simple!
  • Hosting: Hosting is basically the company that puts your website up on the internet so everyone else can see it. Everything will be saved on there. Think of it as a computer hard-drive on the internet where your blog will be saved.
Disclosure: I recommend using Hostgator for web hosting. If you click through one of my links and make a purchase, I will receive a commission, which helps me keep bloggingbasics101.com up and running.
It’s probably one of the cheapest (less than $3 per month) hosting providers out there. A domain name will cost around $10-15 a year, but with Hostgator, you can get that for FREE first year.
If you do sign up with Hostgator be sure to use the coupon code BB101 as this will unlock the maximum discount they offer on all their hosting packages.
:). Big smiles for that!
They’re the providers I use for all of my blogs, including the one you’re reading right now.
If for any reason you don’t want to go with Hostgator, feel free to choose your own hosting company. Most, if not all of them, should have a “one-click” WordPress install solution on their admin panel.
That button will automatically install WordPress on your blog. Did I say it was simple or what?
All you need to do is sign up with Hostgator (or your chosen provider), choose your hosting plan and a domain name and look for the one-click WordPress install button on the admin panel.
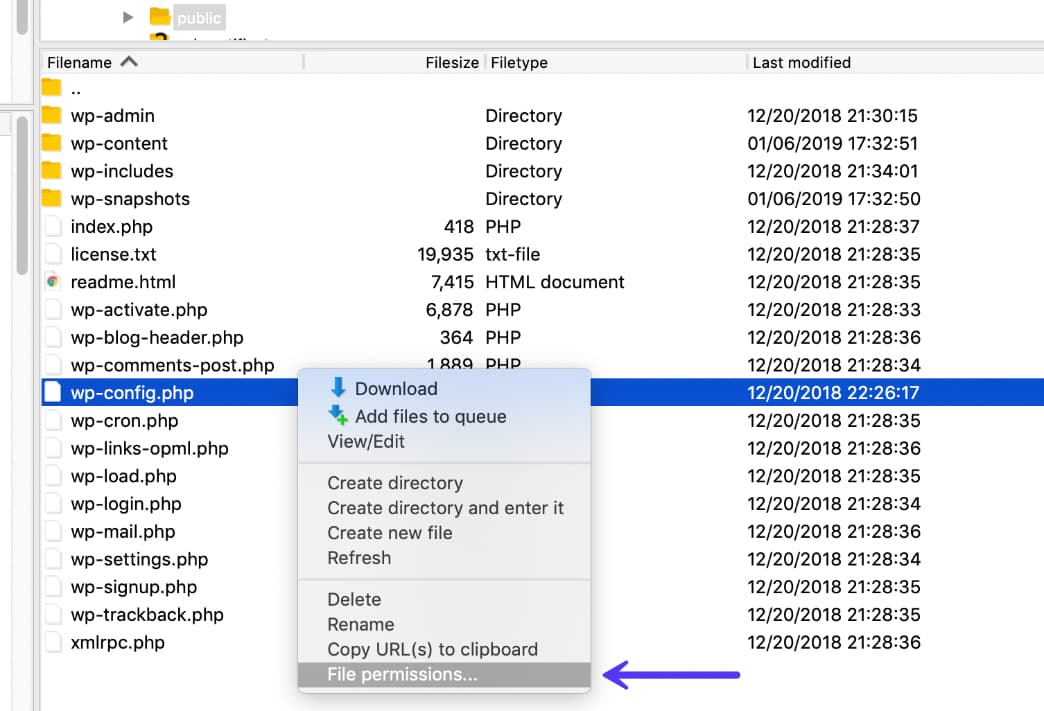
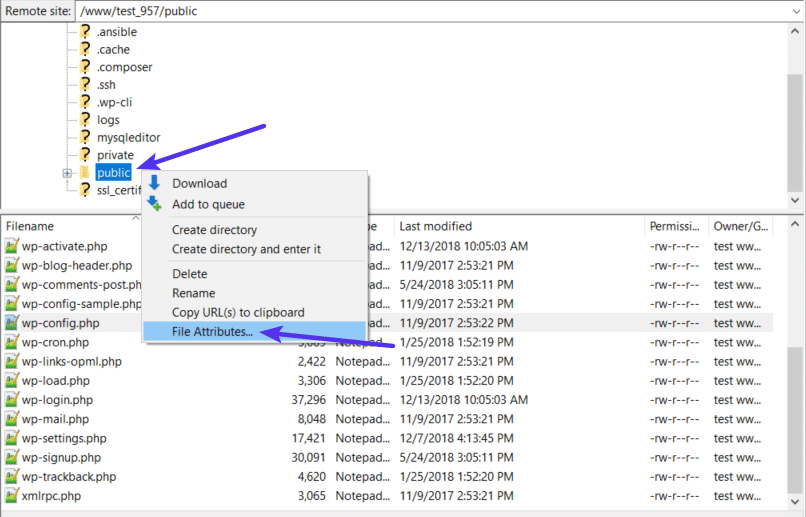
If you are getting stuck at any point this guide may help as it has screenshots.
WordPress essentials aren’t often needed, but I’d recommend whois privacy (that will keep all your personal details private) and definitely automated backups (that’ll save your website just in case anything fails or disappears so you won’t lose any or very little of your blog).
Once WordPress is installed on your website, all you have to do to start blogging is go to your WP-Admin page usually www.yourblognamehere.com/wp-admin and start writing by adding a new post.
At the start, the layout looks confusing, but it gets very understandable quickly. Don’t worry!

Step 4 – Designing your WordPress blog

Now, the fun bit.
Let’s make your blog look exactly how you want it to. To choose a new theme, you can either head to Appearance > Themes and install a free WordPress theme or you can head to a premium theme website like ThemeForest.net and buy a theme for around $40.
I usually choose something that looks professional and pretty easy to customize. WordPress also has this awesome feature that allows you to change themes with just a few clicks. So if you start getting tired of your current blog template, you can just switch to another one without losing any precious content or images.
choose-blog-theme
Remember, your blog’s design should reflect both you and your personality, but also what the blog is about. There’s no point having a football-orientated theme if your blog is about tennis, understand?
On top of that, it should be easy to navigate if you want people to stick around. If it’s tricky and difficult to move around it, people won’t stay. After all design is a subjective art; meaning everyone likes different things.
But no one likes ugly websites, and they especially hate websites that need a university degree to navigate. Make it easy for them.
For more reading, I’ve put together 3 blog posts about designing your blog. Feel free to check them through.
Last step! Woo!

Step 5 – Useful Resources For Beginner Bloggers

Bloggers come to blogging arena with varying degrees of online and social media experience, but we’ve all made more than a few newbie mistakes – there’s always room for more learning and improvement, whether you’re a beginner or you’ve been blogging for years.

Changing your blog design

Once you login you will be in the WordPress administrator area. This is where you can make any changes you want to your blog.
Everyone has a different idea of how they want their blog to look. One of the great things about a WordPress blog is that you can change your entire layout and design with just a few clicks.
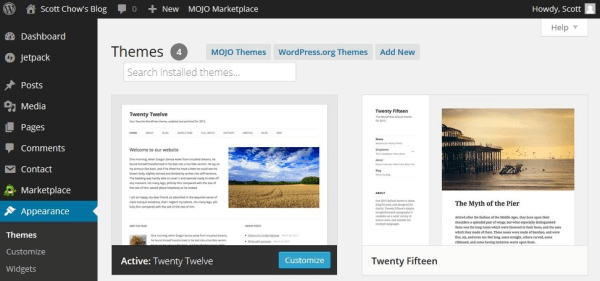
In WordPress, blog layouts are known as “Themes”. What is a blog theme? Themes control the entire design of your blog. To change your theme you are going to click on the “Appearance” tab on the left menu.
You will see several themes are already installed on your blog: Twenty Seventeen, Twenty Sixteen, etc. These are well-designed, clean-looking themes that can work for just about any type of blog. In fact, many of the world’s top bloggers use one of these themes.
Unless you have a very specific design in mind for your blog, I suggest you use one of these themes to start with. For our example, let’s use the “Twenty Sixteen” theme. In order to activate the theme on your blog, hover over the theme and click the “Activate” button. That’s it! You have changed the entire design of your blog with just one click!
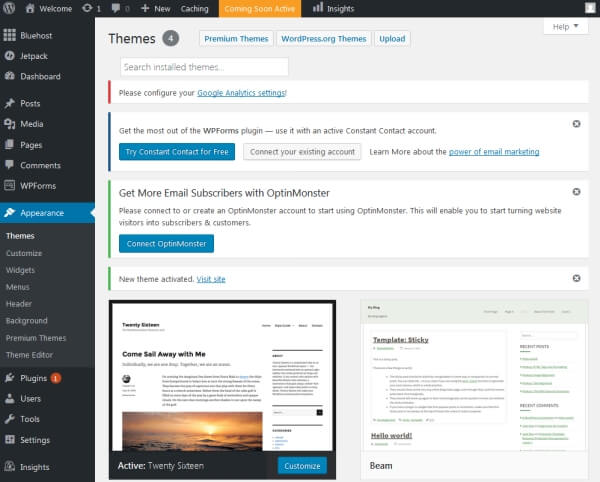
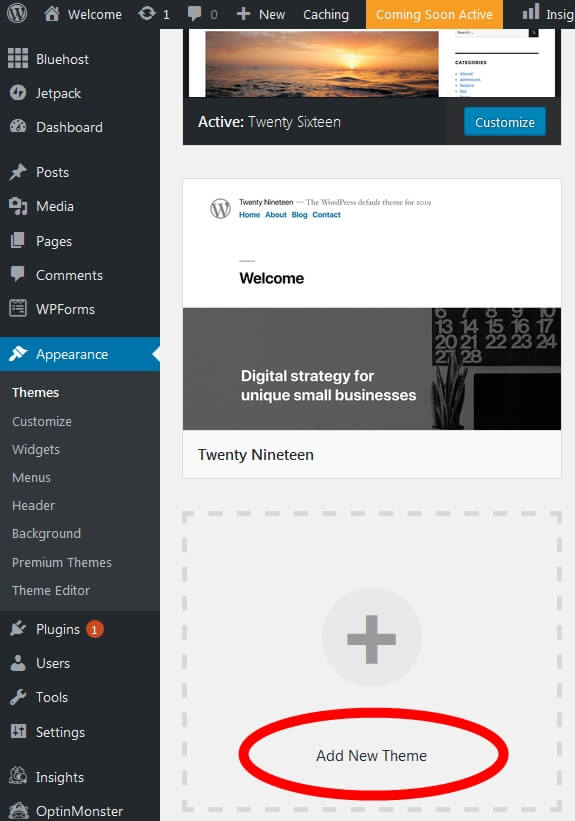
If you don’t like any of the themes that are already installed you can easily choose from thousands of other free themes. To install a new theme, click on the “Appearance” tab on the left menu and then click “Add New Theme”.
This is the theme search screen.  There are thousands of themes to choose from.  You can change your entire design at anytime simply by activating a new theme.  To find a theme you like, I suggest you click on the “Popular” tab and start browsing. When you find one that you like click the blue “Install” button.

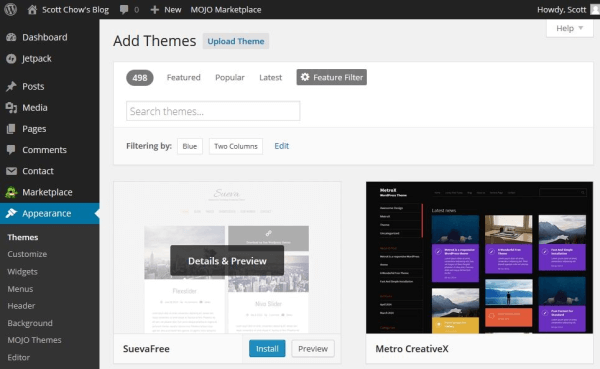
Once the theme is installed click “Activate” to activate the theme on your blog. To see your new theme in action, go to your blog and take a look!
Changing your theme is the simplest way to customize your blog, but there are lots of other customizations you can do. Check out my full post on customizing your blog for an in-depth step-by-step guide. You can also watch the video at the end of this guide to see me completely customize a blog from scratch.

Step 4: How to write a blog post & publish it

Now that your blog is up and running it’s time to actually do some blogging!
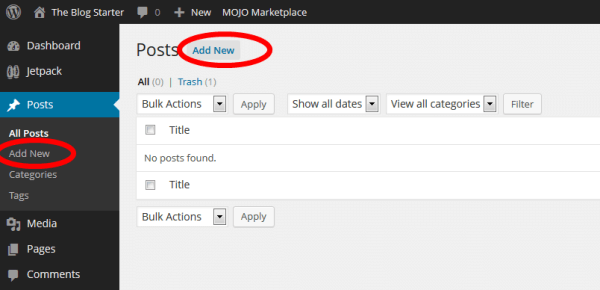
Go to the left menu and click on “Posts”.

You will see there is already a post there. This is a default post on every new WordPress blog, and we don’t need it. To delete it click “Trash” just under the post.

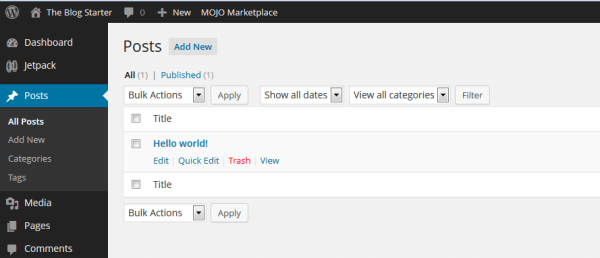
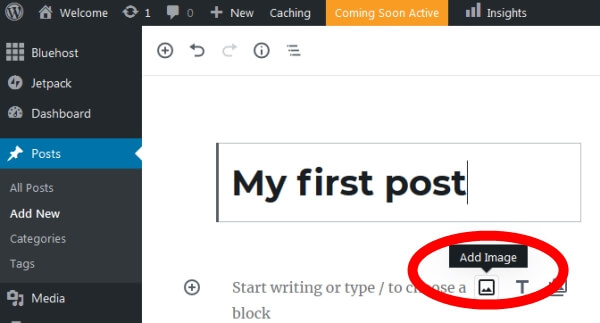
To begin writing a new post, click the “Add New” link.

You are now on the post editor screen. Enter the title of your post in the top box and then begin writing your post in the lower box.
If you would like to add a picture to your post, click on the “Add Image” icon and click “Upload” to upload a picture from your computer. You can make adjustments to the picture size on the next screen. When you are ready click “Insert into post” to add the picture.
Once you have finished your post just click the “Publish” button on the top right side of the screen to publish it.

Publishing Your Blog

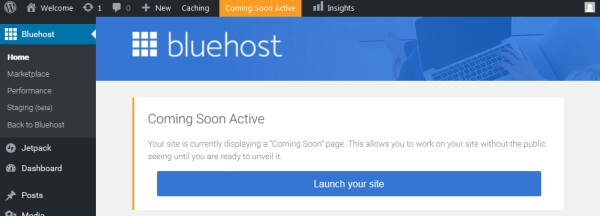
Even after you have written a post your blog may still be showing a “Coming Soon” page.
When you are ready to make your blog public just click the “BlueHost” menu at the top left of the menu in your administrator area then click the blue “Launch” button to remove the “Coming Soon” page.
Congratulations! You now know how to start your own blog and publish content!

Promote your blog

Creating a well-designed blog and writing great content is just the start. In order to get readers for your blog you will need spend some time promoting it, especially when you first start. Click on the strategies below for more info.
These articles may help you avoid some of the growing pains when it comes to your first blog – enjoy!:
Read More
Next PostNewer Posts Previous PostOlder Posts Home