WordPress’ new built-in media players make it a powerful platform for streaming video and audio. But you might notice that your WordPress install has a prohibitive maximum file size for uploads. If you want to know what your site’s upload limit is, you can visit Media -> Add New. Below the upload box you will see “Maximum upload file size” with a number next to it, in megabytes. This is how big your uploaded files can be. By default, this number ranges anywhere from 2MB to 128MB and dictates how big an uploaded file can be. If you find yourself on the smaller end of that scale, you may want to increase your upload limit to accommodate larger media files.

Unfortunately, there is not a one size fits all solution for increasing this limit. How you actually go about increasing the upload limit of your install depends on how your server is configured. In the end, you may have to try a few things before you find something that works. This article will step your through this configuration so that you can find the solution that works for you.
Most of the steps that follow require you to access your site via FTP. If you are unfamiliar with how FTP works, I’d recommend Kevin Muldoon’s guide to installing WordPress. It has a section on accessing your site via FTP.
Setting up a PHP Info File
Before you even start trying out different solutions, it can be useful to try and get some details about how PHP is configured on your site. Luckily, PHP has a simple function to help you do this. Create a new file in a text editor of your choice, and add this line of code to it:
<?php phpinfo(); ?> |
Name the file “info.php” and save it. Then, FTP into the root directory of your server, where WordPress is installed, and drag in info.php. Next, visit “http://yoursite.com/info.php”, replacing “yoursite.com” with the actual URL of your live site. This will give you a full list of details about your PHP configuration.

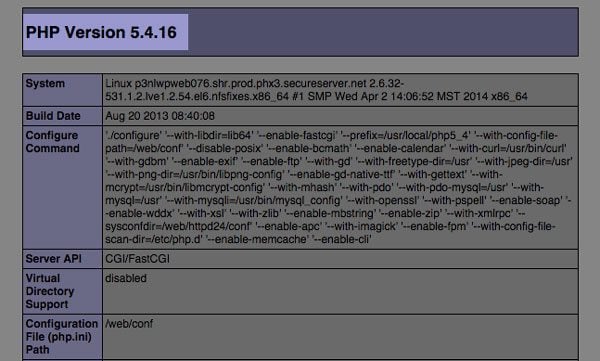
Pay special attention to the version of PHP you are running
There’s a lot here, but you can ignore most of it. The most important part of this file is which PHP version you are running. This will be shown in block letters at the top, for instance “PHP Version 5.4.16”. It’s most important to pay attention to the first number of your version. You will either be running a version of PHP 4 or PHP 5. Some of the tips outlined here will require you to know which version you are running, so take note of it.
There are three settings within the PHP info file that are relevant to your upload limit. You can search through the file to see what they are currently set to.
- memory_limit – This defines how much memory is allocated to PHP. You will simply need to ensure that this number is as high or higher than the upload limit you want to set.
- post_max_size – This defines the maximum size that is handled in a POST request. We will need to set this to our new upload limit.
- upload_max_filesize – This defines the maximum size for file uploads. This will also be set to our new upload limit.
Now that we have a little bit of info about our PHP set-up, we can try a few different methods for increasing our file size limit.
Editing PHP.ini
If you Google around for ways to increase your upload limit in WordPress, you will probably stumble across a variety of answers. Most of these are workarounds, but the best way to increase the file upload size is to make changes to your server’s php.ini file. The php.ini file contains all of your PHP’s configuration details, and will let you change the values you saw on your PHP info page.
Note: Before you start making changes to your server’s configuration, you should make a backup of your site and database. If you find your php.ini file, you will also want to back this file up locally.
Depending on your web host, you may be able to edit this php.ini file directly. To find this file, FTP into your site, and go to the folder that your WordPress install is in. This usually exists in an “html” or “www” folder. What you will need to do is navigate via FTP to the absolute root directory. This will typically be one or two directories higher than where the WordPress files live.
From the root directory of your server, you are looking for the folder that your php.ini file is located. This is typically in a “conf” or “etc” folder. Search through these folders to find a file labeled “php.ini”. If you are unable to locate it, trying searching through your web host’s knowledge base to find its location.
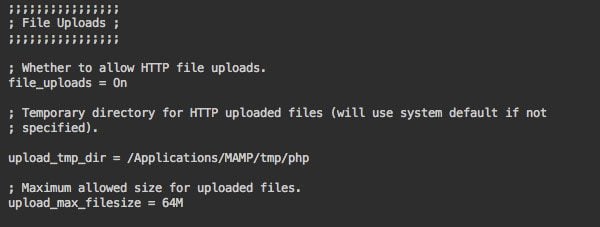
Drag this file to somewhere on your local hard drive, and open it up in any text editor. We will be modifying a few values, so you will need to search through the file to find them. For purposes of demonstration, I am going to increase my upload limit to 64 MB. You can go higher than this, but it’s not recommended that you go higher than 128 MB.

A snippet from php.ini
First, find the “memory_limit” value, and change this to 64M (unless this is already set to something higher). Next, find the the “post_max_size” and change this to 64M. Finally, find the “upload_max_filesize” and once again change this to 64M. It is important that we use an “M” to define our filesize limit in megabytes, instead of the commonly used MB. You may also want to find the “max_execution_time” variable and set it to something like 300. This will ensure that your site does not time out when uploading larger files. In the end, your values will look like this:
memory_limit = 64M |
upload_max_filesize = 64M |
post_max_size = 64M |
max_execution_time = 300 |
Though these values will be scattered throughout the file. When you are done, save your file, and drag it back to the directory where your php.ini file is located and overwrite the existing file. It may take a little while for these changes to take effect. If you are on a dedicated server and are able to, you should try restarting your server. If you’re unclear about how to restart your server, check with your web host. Otherwise, make sure your browser and site’s cache is cleared. Hopefully, when you visit Media -> Add New you will see a new maximum upload size, and you’ll be all set.
Uploading your own PHP.ini
If you are unable to find your php.ini file, or if your web host does not give you access to it, you may be able to upload your own file to override the default settings. To do so, create a new file and open it up in your text editor. Then, paste in the following code:
memory_limit = 64M |
upload_max_filesize = 64M |
post_max_size = 64M |
file_uploads = On |
max_execution_time = 300 |
Once again, I am setting my upload limit to 64MB, but you can change this value to whatever you want.
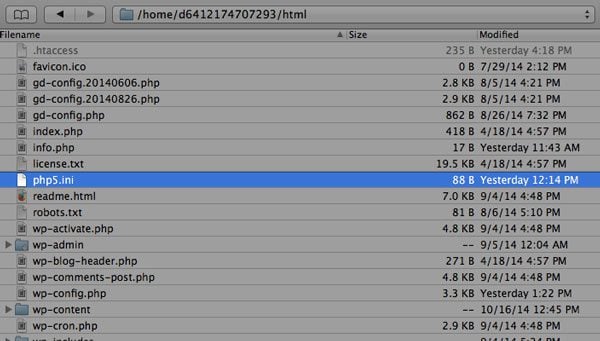
Remember your PHP version above? If you are on PHP version 4, then save this file as “php.ini”. If you are on PHP version 5, then save this as “php5.ini”. If you do happen to be running version 5, and the above filename does not work for you, then you can rename it “php.ini” and upload it again.

The php.ini file using the Cyberduck FTP Client
Then, FTP into your site again, and find the root directory where your WordPress files live. Drag this file into this directory.
Once again, if you have the ability to restart your server you should, then clear your browser and site’s cache. To confirm whether or not this method worked, go to Media -> Add New and check to see if your maximum file size has increased.
Using .user.ini
If that method still isn’t working for you, you may have another option. This will only work if you are using a version of PHP 5. Otherwise, you can skip this section.
Create a new file, and this time call it “.user.ini”. In that file, paste the following code:
upload_max_filesize = 64M |
post_max_size = 64M |
memory_limit = 64M |
max_execution_time = 300 |
You can change the value of 64M to match your new desired upload limit. Save this file, and then drag it into the directory of your WordPress install using FTP. If you have the ability to restart your server, you should do so. The changes may take a bit to take effect, but go to Media -> Add New to confirm.
Trying .htaccess
If you’ve tried the php.ini solutions, and none of them worked, there may be a solution that lies in your htaccess file. In general, htaccess is used to configure an Apache server. However, it can also be used to change PHP values, if your PHP version is set up as an Apache module.
Before you edit your htaccess file, make sure you have a backup. Changing this has the ability to cause an Internal Server Error or a blank white screen, which can easily be removed by simply re-uploading your original htaccess file.
To access your file, go to the root directory of your WordPress install. Make sure that you’ve enabled your FTP client to view hidden files, then open up the file labeled “.htaccess” to edit. At the bottom of the file, paste in this code:
php_value upload_max_filesize 64M |
php_value post_max_size 64M |
php_value max_execution_time 300 |
php_value max_input_time 300 |
Then save this back to your server. Visit your site, and look for any errors. Then, you can go to Media -> Add New to see if your maximum upload size has taken effect. If you run into any problems, upload the backup htaccess file you saved locally.
WordPress Config File
If all else fails, there is one more trick you can try. This will require editing your WordPress files directly.
The first step is to FTP into your server, and drag your “wp-config.php” file, located in the root directory, so that you can edit locally. Open up the file, and at towards the bottom add the line:
define('WP_MEMORY_LIMIT', '64M'); |
Then upload this file back to the server.
The navigate to your active theme folder in “wp-content” and drag your “functions.php” file to your hard drive so you can edit it. Open it up, and at the very top, insert:
@ini_set( 'upload_max_size' , '64M' ); |
@ini_set( 'post_max_size', '64M'); |
@ini_set( 'max_execution_time', '300' ); |
This may be able to edit your server’s php.ini file at runtime. Historically, this is the most effective solution. But on some older set-ups or shared servers, this can sometimes be effective. once again, clear your browser and site cache, and visit Media -> Add New to see if your new limit has taken effect.
Contacting your Web Host
If none of the above solutions work for you, the next step is to contact your web host. Tell them you want to increase the “memory_limit”, “upload_max_size” and “post_max_size” in your php.ini file. Most hosts will not have a problem doing this. If your hosting service will not let you, or are unresponsive, it may be time to find hosting elsewhere.
Increasing Upload Limit on MAMP
Sometimes, you are developing your site locally and you want to increase your limit there. If you are on a Mac, you may be using MAMP, a local server that gives you access to Apache, MySQL and PHP. In other words, everything you need to run WordPress.
Fortunately, you will have access to your php.ini file in MAMP, you just need to know where to find it. The first step is to go to to the “PHP info” section located on the MAMP homescreen, up at the top. From there, mark down your PHP version.
Once you know that, go to “/Applications/MAMP/bin/php/PHP_VERSION/conf”. In the “php” folder you will see a list of different PHP versions, so make sure you navigate to the version your system is currently running. From there, you can open up the “php.ini” file, and follow the instructions above. Ultimately, you are going to look through the file to change these four variables:
memory_limit = 64M |
upload_max_filesize = 64M |
post_max_size = 64M |
max_execution_time = 300 |
And you’ll be all set with a new upload limit in your local environment.
Increasing Upload Limit on WAMP
The Windows equivalent of MAMP is called WAMP. And like MAMP, you will have access to your php.ini file. To find it, go to “C:\WampDeveloper\Config\Php\php.ini” and open up the php.ini file. Make the changes outlined above, keeping your eye on the four variables that relate to the upload limit in WordPress.
memory_limit = 64M |
upload_max_filesize = 64M |
post_max_size = 64M |
max_execution_time = 300 |
After you change these parameters, the upload limit will be increased.
Finding Your Solution
Unfortunately, there are quite a few things that you may need to try before you can increase the upload limit on your WordPress install. I can’t guarantee that they will work, but hopefully one of these will. If they don’t, don’t hesitate to reach out to your web host for help. A good host will assist you quickly, and get you up and running in no time. PHP configuration is no simple task, but with the meda-rich abilities of WordPress, it may be necessary for you to do so.
Article thumbnail image by Anikei / shutterstock.com


0 comments:
Post a Comment
Subscribe to Perfect BloggersTech by Email
Don't Spam Here ! You will Be Blocked Permanently