Meet The Author

Main Uddin is one of the pioneer blogger cum e-marketer from North East India(Assam).He is also a Skilled web Developer and regular columnist for various news portals around the globe.Read More

author

Top 10 mantras for successful bloggers to become entrepreneurs

Leave a Comment
Blogging is not the matter by accident or over night matter of fact. Honestly, success does not happen by luck, and wealth does not happen by accident--those who have built wealth and success have deliberate habits that make them more productive and effective. To emulate these habits, we must train ourselves and be focused; we must take our bad habits and replace them with new ones. Normally, Bloggers become well established entrepreneurs  as available information says like so. I don't claim to be a successful entrepreneur but surely get something new in blogging by following some extra mantras than common bloggers and marketers. Honestly, This article is heavily influenced by Malene Jorgensen who is one of the all time favourite blogger cum entrepreneur for me. 

Top 10 mantras for successful bloggers to become entrepreneurs 

 Malene Jorgensen ! Bloggers ! Clomnist !Speaker
Photo: Malene Jorgensen ! Bloggers ! Columnist !Speaker

It is listed 10+ powerful habits that can help you build success and wealth. How many do you already have in place, and which ones do you need to pick up?

1. Be an early riser:

 Research shows that 44 percent of wealthy people wake up three hours before going to work, compared with just 3 percent of those who are not wealthy. Just the simple act of getting up early adds an hour a day to their lives. Imagine how much productive work you can get done early in the morning, with no interruptions or distractions. Or use this extra time to work on setting goals and exploring opportunities.

2. Network :

Research says that 79 percent of wealthy people spend at least five hours a month networking--going to conferences, meeting new clients, attending webinars, meeting for coffee--while only 16 percent of the nonwealthy do. Spending time with like-minded people allows you to align yourself with others and learn from them. Whom you hang out with determines what you talk about and what you do about it; you can change your career outcome by being with successful people who will teach you, lift you, and support you.

3. Scratch the itch:

 The most successful people are those who felt an itch and began to scratch it--and from there, they became focused as a laser on what they wanted to achieve until they made it their reality. Follow their determination; ignore the noise and keep your FOCUS: Follow One Course Until Success.

4. Read to learn:

 According to research, 86 percent of wealthy people love to read, as opposed to 26 percent of those who are not wealthy. When you read, make sure you read to learn. Those who achieve wealth and success are constantly in a state of self-improvement; they read to learn and grow. As Dr. Seuss said so well, "The more that you read, the more things you will know. The more that you learn, the more places you'll go."

5. Make a list:

 To achieve an overarching goal, you need to list what you want to accomplish. The majority of wealthy people create daily to-do lists--81 percent of them, in fact, compared with 19 percent of those who are not wealthy. What's more, 67 percent of wealthy folks actually complete 70 percent or more of their to-do items every day. They have goals they focus on, and they work hard to achieve them.

6. Get off the couch:

 It's an hour or less of daily TV for 67 percent of wealthy people, while only 23 percent of the rest limit their TV intake. When it comes to reality shows, only 6 percent of the wealthy watch them, compared with 78 percent of the nonwealthy. Wealthy people choose more productive and meaningful activities.

7. Treat time as a precious resource. 

Wealthy people avoid wasting time on unimportant matters or distractions. They don't sit for hours at their computer on social media, because they know that time is a nonrenewable resource. Time wasted is not time you can get back.

8. Take intentional risks:

 Wealthy people understand that risks lead to rewards. As a result, they're more willing to take risks--not reckless risks but calculated ones. The very successful know what they stand to lose if a risk fails and they don't get the reward they are seeking. Most have a plan B in place to minimize the failure, and move forward with a new plan. If the current risk doesn't go your way, there's always another solution.

9. Work smarter, not harder:

A smart approach to work, including taking breaks, makes people more productive. Hard work is critical, but that doesn't mean they can never enjoy personal time for relaxation and self-improvement. They have a good balance of work, personal tasks, and pleasure so they can be more creative and more productive--which, in turn, makes them more effective. Work hard, and then take a break. When you come back, you'll be refreshed and more productive.

10. Invest in your health:

 Wealthy people understand the importance of eating right and working out to stay healthy. Studies show that 76 percent of wealthy folks do aerobic exercise at least four days a week, compared with 23 percent of people who are not wealthy; 57 percent of wealthy people count calories every day, as opposed to 5 percent of the nonwealthy. Even more interesting, 70 percent of rich people eat fewer than 300 calories of junk food a day. Wealthy and successful people know the correlation between healthful eating and working out and their ability to accomplish the things they want to do.

11. Foster your emotional intelligence:

 Wealthy people know that having good relationships is crucial to success. They are tuned in to their own emotions, which also means they're perceptive at reading the emotions of others. Warren Buffett has stated that emotional intelligence, more than IQ or expertise, accounts for 85 to 90 percent of success. IQ is a threshold competence--you need it, but it does not make you a star. But emotional intelligence can.

12. Quotes from Experts

When you include quotes from established experts (or up-and-coming ones), youadd authority, value and interest to your blog posts. Sometimes, you may well find that a blogger or author has given a concise summary of something you wanted to explain to your readers. Quoting from them is more efficient than attempting to rewrite their words as your own. You can also use inspirational, provocative or funny quotes to get readers’ attention. These can work well at the start of blog posts or on Twitter and Facebook. When you include a quote that’s longer than a sentence, it’s usually a good idea to use blockquote formatting to make it stand out.

13. Reputation Matters

In any form of business, your reputation matters. If you ran a local store and ripped off customers or provided shoddy goods, your community would quickly learn about it, and avoid you. Hopefully, of course, you’d offer quality products at a good price, with a smile – and customers would tell their friends. Online, the word-of-mouth effect is massively amplified, which can make or break a business. Even a whiff of a poor reputation can turn potential customers away.

Google your company name (or your own name) and see what comes up on the first few pages. If you get links to your blog, Twitter profile, Facebook Page or positive articles about you, you’re fine. It could also be a good idea to establish a presence on several social media sites, as these typically rank highly for your company name on Google.

14. Pay it forward:

 To be truly wealthy, you need to understand the importance of paying it forward. As Albert Einstein said, "Only a life lived for others is a life worthwhile." What you have, you share. Help someone, because along the way someone helped you. And the truth is, life is always about giving what you get.

Final words: 

Success is not something that can solve our problems, and it doesn't always come to those who deserve it. But it can be an indication that you have worked hard, stayed focused, and prioritized on what is important. Ultimately, though, wealth is not measured by how much you have but by how many hearts you have touched. 

If this list of essentials seems a little overwhelming to you right now, don’t worry. If you focus on coming to grips with just one of these each week, you’d cover them all within the next six months – and you’d begin to see the benefits very quickly.
Read More

Get Advanced SEO reports for Successful Marketing Strategies

Leave a Comment
There are thousands of online tools, those provide so reports either free or costing a few bucks. Normally, seo reports provide future marketing plan strategies on particular audience or geo target orientation. If you are a Marketing Agency or an SEO firm, you must be making monthly reports to send to your clients. Now most of the firms and agencies (and even webmasters) uses online report generators to create branded SEO and Marketing reports which shows various parameters to measure your campaigns.


Previously I had collected a list : 
You can of course make such reports by yourself too by gathering data from google analytics, Alexa and other similar installed analytics script but most of these reporting tools are reasonably priced (some of them are free too) and make professional looking branded reports (so you can put your own logo and company names) and it is worth giving them a try.

Here is the list of top 12 such SEO and Marketing report generating Softwares and Tools –

1. WooRank :

WooRank though started in 2011, has quickly become one of the biggest website to generate SEO reports mostly because of heavy search engine ranking they get because of their hosted onsite reports. I have created report for inBoundio.com with their 7 day trial and it looked pretty good considering there wasn’t much traffic and data to show. The only problem with WooTools is that $149/month looks to be on costlier side though they do have $49/month plan too with no pdf downloads.

2. iwebchk :

 iWebChk is another popular tool like woorank which is much cheaper at $20.

3. FreeSEOReport :

 I am not sure the site is fully working or not as it has been some time since I have used it. I tried to generate a report for inBoundio but never got the mail with the report.

4. Tutor.rs :

Tutor do some basic reporting for your site.

5. BrightLocal

It is another SEO tool which helps you in creating SEO reports though it costs $20/month.

Some of the other lesser known or tools which gives partial report are –

6. OpenSiteExplorer:

You can also use SEOMoz’s OpenSiteExplorer to get more data about your backlinks though it do not generate reports and shows limited data.

7. Juxseo :

Simple one page web-based report.

8. SEOSiteCheckup:

 Simple one page web-based report.

9. Google Webmasters SEO Report:

 In your google webmasters account, you can see the option to generate cumulative reports so if you have access to client webmasters account, you can build the SEO reports.

10. Bing Webmaster Report:

 Bing Webmasters also gives you basic SEO report though just like google webmasters, you can only see the reports unless the site has installed bing webmaster code and you have the access to the account. 

11. ahref:

 They have free basic reporting tool even though the tool is mostly for enterprise clients at $500/month

12. TrackPal:

TrackPal makes nice visual reports from site analytics, social media, paid search and display.

Final line: I am sure These tools surely give some deep insights of your marketing strategies any where and any time mode. 
Read More

Static IP Address of a website and business success

Leave a Comment
As a business owner you are always faced with financial considerations. That question, “How can I save money?” Or, “Do I really need this?” They are common questions. When it comes to your Internet connection, we have recently described how saving money on your Internet connection is often times, not the best choice.

Static IP Address of a website and business success 

Then there is the matter of the static IP address. Why is this also costing you more money? Those Internet providers are always trying to find a way to take more of my money! Or, are they?

There are many benefits of dedicated IP hosting. Dedicated IP allows for your own anonymous FTP area, and it allows you to serve an SSL web site with your certificate. Another benefit is the ability to stack multiple sites on the same address without worrying about interfering with any other sites, these would be "addon domains" and can be setup in cPanel. An addon domain is a domain that points to a folder within your web folder it allows you to host more than one domain on a hosting account, you must register the new domains as you would any other. Most businesses use high speed Internet to run private or public servers. These people want their Internet address to stay fixed with the same numbers all the time, so people know how to access their server.

1. Scam and Spam Blacklist Protection - 

In a shared hosting environment, if someone you share with a common IP gets trouble for spamming or scamming, the shared IP address could get blacklisted or banned by Internet Service Providers (ISP) and it would affect all domains using the said shared IP address. When your shared IP address is banned or blacklisted on some ISPs, your website will not be accessible to some areas in the world and your emails get blocked. It would directly affect your online business operations, search engine ranking and reputation. Getting a dedicated IP address resolves this. A dedicated IP isolates your domain and protects it from being affected from the consequences of abuses done by other shared users.

2. Business Identity Support –

With a dedicated IP address, online businesses can have the confidence of better identity. Customers feel unsafe doing monetary transactions on sites that use a shared IP address because of reliability and security issues. A truth about this is that security certificates like private SSL requires a website to run over a dedicated IP address before it can accept credit cards online. Although you can still run an e-commerce site using a shared IP address, through a shared SSL certificate, having your own dedicated IP will make things easier and convince your customers to avail products or servicesand close deals.

3. Enhanced Search Engine Optimization –

Search engines track websites through their addresses (domain name and IPs). It has been found that most search engines favor websites running over dedicated IP address. Sites with a dedicated IP addresses do better in ranking on Search Engine Results Pages (SERP). For online businesses, this concern is very important.

4. Extended Hosting Functionality –

Certain functions on a shared hosting plan cannot be enabled if you are using a shared IP address. For instance, Anonymous FTP can only be enabled with a dedicated IP address. Anonymous FTP lets anyone using FTP client software to access the files in a special directory of your site. Also, having a dedicated IP allows access to your website by FTP even if your domain name is still inaccessible due to propagation.

Although these days most browsers are compatible with shared IP hosting, dedicated IP accounts are compatible with all browser types. Customers who have Dedicated IP Internet Web Hosting accounts also enjoy the option of creating a site without a domain name (some types of businesses or parties designing private intranet websites prefer IP-only access structures).

5. Scam and Spam Blacklist Protection - 

In a shared hosting environment, if someone you share with a common IP gets trouble for spamming or scamming, the shared IP address could get blacklisted or banned by Internet service Providers (ISP) and it would affect all domains using the said shared IP address. When your shared IP address is banned or blacklisted on some ISPs, your website will not be accessible to some areas in the world and your emails get blocked. It would directly affect your online business operations, search engine ranking and reputation. Getting a dedicated IP address resolves this. A dedicated IP isolates your domain and protects it from being affected from the consequences of abuses done by other shared users.

6. Business Identity Support – 

With a dedicated IP address, online businesses can have the confidence of better identity. Customers feel unsafe doing monetary transactions on sites that use a shared IP address because of reliability and security issues. A truth about this is that security certificates like private SSL requires a website to run over a dedicated IP address before it can accept credit cards online. Although you can still run an e-commerce site using a shared IP address, through a shared SSL certificate, having your own dedicated IP will make things easier and convince your customers to avail products or services, and close deals.

7. Enhanced Search engine optimization – 

Search engines track websites through their addresses (domain name and IPs). It has been found that most search engines favor websites running over dedicated IP address. Sites with a dedicated IP addresses do better in ranking on Search Engine Results Pages (SERP). For online businesses, this concern is very important.

8. Extended Hosting Functionality –

Certain functions on a shared hosting plan cannot be enabled if you are using a shared IP address. For instance, Anonymous FTP can only be enabled with a dedicated IP address. Anonymous FTP lets anyone using FTP client software to access the files in a special directory of your site. Also, having a dedicated IP allows access to your website by FTP even if your domain name is still inaccessible due to propagation.

9. The Need for a Static IP Address!

People with a static IP address may have a domain name or corresponding email accounts, such as [InsertYourBizNameHere].com, linked to their IP address. So if the IP address changed whenever they had to turn their modem or router off, their server and thus the email could become unreachable.
A static IP address can also help when VPNs are being set up for remote access to your business office resources. Without the ability to also know your offices “calling card,” work would be cumbersome.

10. The Additional Cost…

So the additional cost of a static IP address is a result of multiple things:
  • There are a limited source of public IPv4 IP addresses. While they are working on IPv6 to expand the IP pool, the tech and implementation still has a ways to go.
  • ARIN, the American Registry for Internet Numbers, is responsible for the allocation of all public IP addresses to providers. Providers must prove the necessity of the need for all IP addresses they are provided. There is a cost associated to the provider for each pool of addresses. In other words, the providers don’t get IPV4 addresses for free either.
There are more resources, both technically and in man hours, to managing static IP addresses because of their “always on” nature. It limits maintenance and provides more accountability for the provider.
So if you are a business, looking at the costs at the end of the day – know that your static IP address is worth the small price you pay for it for all it gives you in return.
Read More

SMF forum footer & header customization and marketing success

Leave a Comment
Simple Machines offers free open source software such as SMF, the powerful and easy to use community forum written in PHP as the message-board program developed by The Simple Machines Organization. This forum can be used as a successful marketing tool as thousands of internet users like to use it for their simple using methods.


SMF forum footer and header customization


Changing the header title of your board is usually one of the first changes people usually make to customize your board. This helps give your site a bit of identity and can help set it apart from other websites. A good title can also help with your site's Search Engine Optimization, known as SEO. Follow the article below to learn how to edit your board title for your SMF 2.0 website.

1. Log into your SMF admin dashboard.

From the entry page, click Admin from the upper menu. This will reveal a second menu just underneath the first. Hover over Configuration and then hover over Server Settings. Click on the General option from the popup menu.

2. This lands you on the General Server Settings page. From here you will see a few settings. Look for theForum Title field and enter your new site title there.

3. Once you are happy with your new title, click on the Save button located in the lower right hand corner of the screen. This will save and activate your new header title.

Before
 
After


You can also remove the links and version number as well, giving you some more space. While technically allowable to remove the copyright, it is considered rude to do so since Simple Machines allows their program to be used free of charge. Follow the instructions below to find out how to modify the footer in your SMF 2.0 website.


Changing the footer content in SMF 2.0

1. Log into your SMF admin dashboard.
2. From the main page, click on the Admin link from the upper menu. This brings a second menu that appears just below the first. From there, hover over Configuration and click on Current Theme from the popup submenu.
3. A third menu will appear on the screen below the second. Find and click on the Modify Themes link to continue to the next screen.
4. You will see the different themes you have available under the Modify Themes section. Find the theme you want to modify and click on the Browse the templates and files in this theme link.
5. This brings you to a page where you will see various sections of code. Do a find (ctrl+f) for the word 'footer' and locate the section that has the following code:

<div id="footer_section">

This is the beginning of the footer area code. From here you can edit the code with HTML. For our example, we will add some text with our own copyright. You can see the line we added below highlighted in blue.
6. After adding the code, select the Save button at the bottom of the page. You can now refresh your site to see the either the new content or removed content.

Before
 
After

Webmasters can get full tutorial to set up Simple machine forum : Video

1. Forum Tutorials - Simple Machines Forums, Tutorial and Overview 2. How To Customize Your SMF Forum (+ Commentary)
Read More

Set up Online Shop with the Help of Shopify Instantly

Leave a Comment
Here’s a step-by-step guide on how to build your own online shop with Shopify.
I’ll cover all the basics and bit more, so you could get your online store up and running ASAP (We’re all busy, I know).
If you get stuck (I doubt you will), leave a comment or get in touch with me via contact form.
Let’s get started…

Set up Online Shop with the Help of Shopify

Signing up with Shopify and starting your store couldn’t be any easier and they even offer a 14 day free trial to get you going.
To launch your Shopify store, you must sign up for an account.

1. Sign Up with Shopify

To start, visit Shopify.com. Use the signup form to start creating an account.
Enter the required details and then click the ‘Create your store now’ button.
Your store name needs to be unique or Shopify will ask you to choose something else.
After this initial screen you’ll be asked for a few more details, these include your name, address, country and a contact number.
You will also be asked if you have products and, if so, what you aim to sell. If you’re just trying out Shopify to see if it works for you, you can select ‘I’m just playing around’ in the ‘Do you have products?’ dropdown, and ‘I’m not sure’ in the ‘What will you sell?’ section.
Once complete, click ‘I’m done’.

2. Start Setting Up Your Online Shop

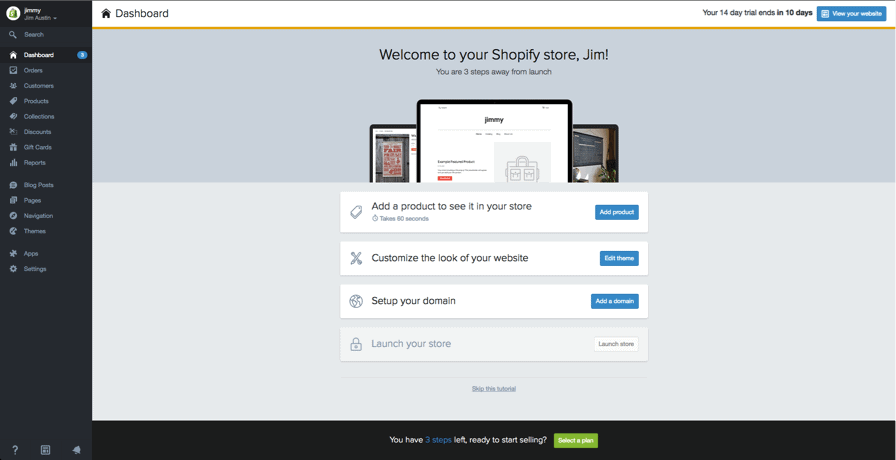
After you’ve signed up you’ll be directed straight to your store admin screen. Now you are ready to start customising your store’s look, uploading products and setting up payments and shipping.
Shopify homescreen Your home admin screen tells you all you need to know to get you up and running.

3. Choose a “Theme” or “Layout”

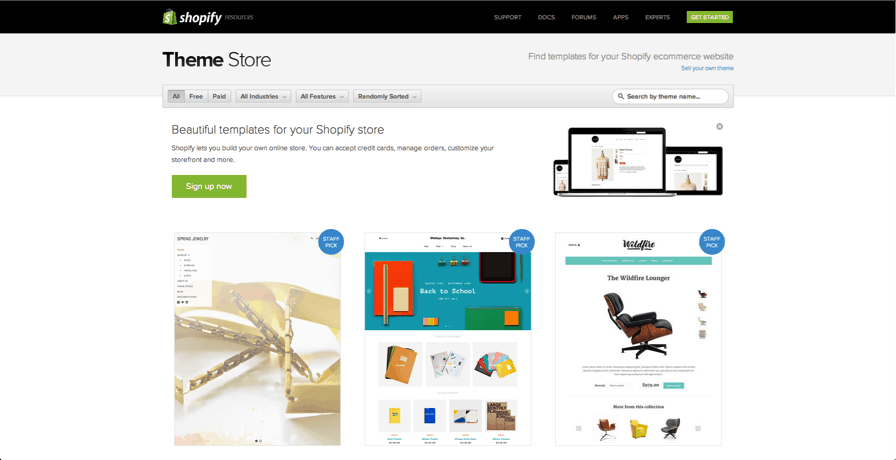
Shopify has its own official theme store. These themes are all guaranteed to have full support from the designers so you know your store is in good hands.
All themes come with a comprehensive list of modifications you can make without having to touch a line of code. The premium themes come with more modifications, but that’s not to say you can’t achieve a great looking site with a free one. These changes are outlined in the next section.
If you want to make wholesale changes to a theme, there are very few limitations on what can be achieved by accessing the HTML and CSS. Don’t worry if you haven’t got any coding experience. Shopify has an international team of design agencies they call ‘Shopify Experts’ that you can hire to fully customise your site.
To find a theme that suits your needs we recommend the following:

1. Browse the Theme Store

Log into Shopify and visit the Shopify Theme Store at themes.shopify.com. Here you’ll find over 180 theme variations to choose from, including a good selection of free ones.
You can filter by paid or free, industry and by features. You can also sort themes by price, popularity, and most recent.
browse-theme-store The Shopify Theme Store.

2. Check the functionality and reviews

Once you’ve found a theme you like, click on the theme’s sample image. You’ll be given more information about the theme, such as whether the theme is responsive/mobile ready among other features.
Scroll down to read some reviews to find out what e-tailers using the theme think of it.

3. Preview the theme

To see the theme in action, click View Demo. You’ll see this below the green ‘Preview Theme in your Store’ button.
If the theme comes in a range of styles, you can also view demos of the different styles by clicking on them.

4. Get the theme

Once you’ve found a theme you like, click the green button.
Shopify will ask you to confirm that you want to install the theme.
Click Publish as my Shop’s Theme.
Don’t worry if you’re not 100% sure it’s the right theme for you. You can always change your mind later.
After the theme has installed, Shopify will let you know, and will give you the option to Go to your Theme Manager. Click this.
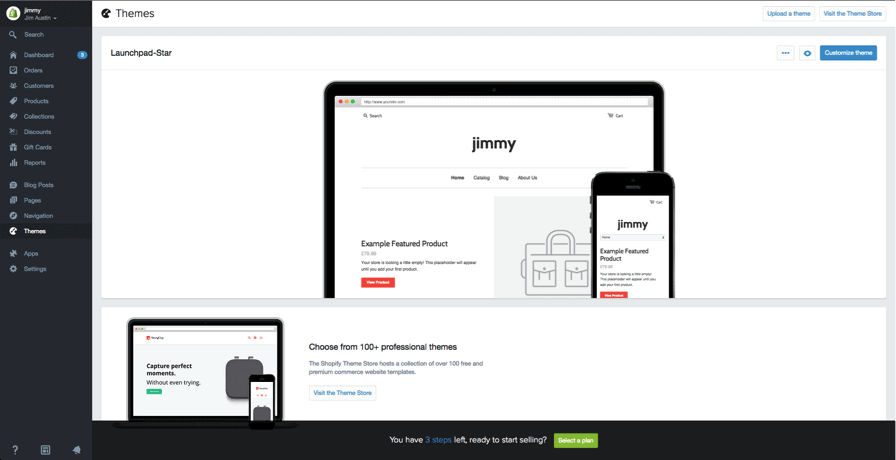
Your theme manager shows published themes (the one you installed or activated most recently) and unpublished themes below (previously installed themes).
finish your ecommerce store

4. Edit Shopify Settings

The majority of Shopify themes allow you to make simple changes that can massively change the appearance of your store, so you can rest assured knowing you won’t end up with a website that looks like a clone of thousands of other stores.
shopify store templates
These stores are all built using the same theme.
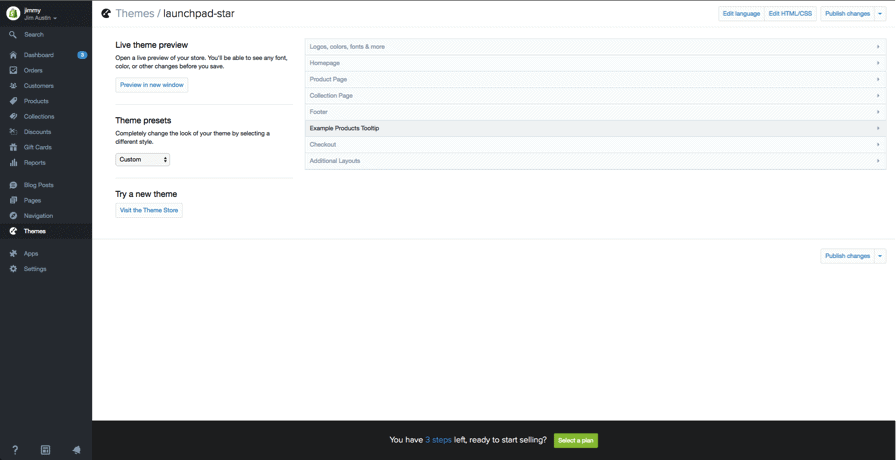
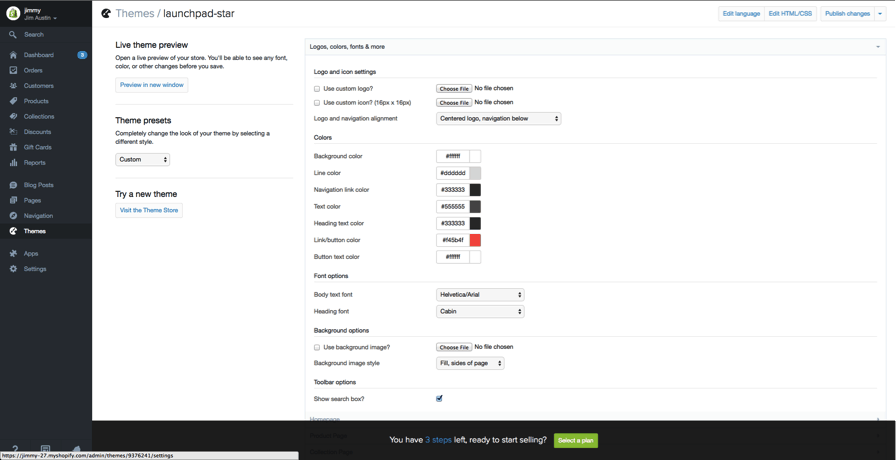
On your admin screen, select ‘Themes’ from the left hand navigation menu. On this page you will see your live theme in a box at the top, in the top right hand corner of that box will be two buttons. The first one is of three dots, which gives you some basic settings changes. One of these allows you to make a duplicate of the theme. We highly recommend you do this incase you make some changes you don’t like, then you can delete the duplicate and start again. The second button says ‘Customize Theme’. If you click that you will be taken to a page that controls all the basic functionality of your store. This is a great time for you to have a thorough play with the settings and test out all the features so you can find out what your site is capable of.
shopify custom theme settings
Your themes custom settings.
changing colours in your theme
Changing colours in your theme.
The most common features will include:
  • uploading logos
  • uploading slides to a homepage carousel
  • adding related item functionality to product pages
  • choosing how many items appear on each line of the collection pages
  • colour schemes
  • font choices.
Some themes will also allow you to reposition elements on pages such as showing product images on the left, right or center of the page. You can also choose whether you want to display social like/tweet/pin/+1 buttons.

5. Add Your Products to The Store

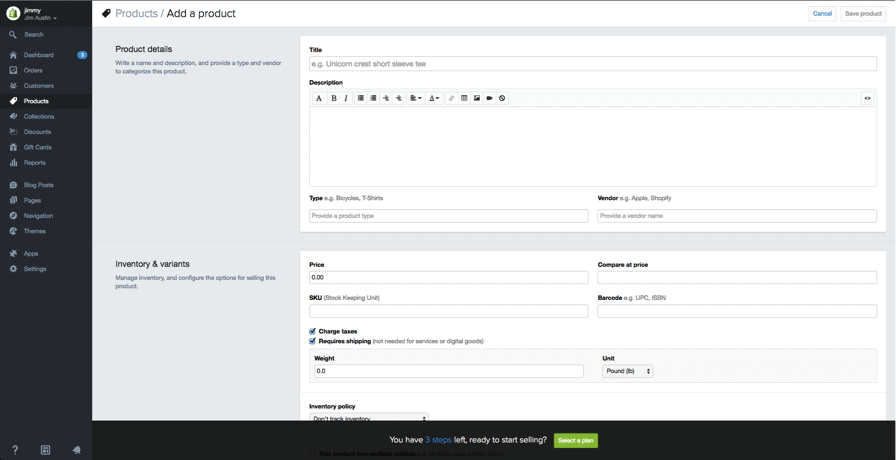
Again, navigating from the bar on the left select ‘Products’. You will then see a blue ‘Add a product’ button in the top right hand corner of the page. Use the following screen to add as much detail as needed about your products. Especially look at those that will help with SEO such as name, description and URL. Also include as much detail about variants as possible to help inform customers about your items.
This is also the screen where you upload product pictures. Once the images are uploaded you can rearrange them so don’t worry about uploading them in any particular order.
Your product screen
The Product screen. Make sure you fill out as much information as possible.
Product images can make a sale so make sure you show your products off to their best and highlight any special or unique features with close up photos. To keep your store looking tidy we suggest you keep all images the same dimensions. Unless of course you plan to make your collection pages look like a Pinterest board.
Once everything is filled out always remember to click the ‘Save product’ button in the top and bottom right hand corners.

Set up collections (group of products)

A collection is any group of products that have some feature in common that customers might look for when visiting your store. For example, your customers might be shopping for:
  • clothes specifically for men, women, or children
  • items of a certain type, such as lamps, cushions, or rugs
  • items on sale
  • items in a certain size or color
  • seasonal products such as holiday cards and decorations.
Products can appear in any number of collections. Usually, you would display your collections on your homepage and in the navigation bar. This helps customers find what they’re looking for without having to click through your whole catalog.
Your product screen
The Collection set up screen works in exactly the same way as the Product screen

Manual and automatic collections

When you add a new collection, you can select how products should be added to it. These are the two options:
  • Manually -
You add and remove products in a manual collection individually.
  • Automatically -
You can set up selection conditions to automatically include products that meet certain criteria.
Payment gateways
A payment gateway allows you to take payment from your customers via your website. The price and commission rate is important, but it’s also important to see what features they offer. Not all payment gateways are created equal.
You need to look at the following when choosing the right payment gateway for you.
payment gateways
  1. Transaction Fees
When you take a payment, some gateways will keep a small percentage or flat fee (or sometimes both) for letting you use their service. Compare these based on what your anticipated sales are.
  1. Card Types
You need to know what types of card are accepted by your chosen Payment Gateway. All accept VISA and Mastercard, while most accept American Express. Paypal is also becoming popular for online payments.
  1. Offsite Checkout
Some gateways will take the payment on their own servers via their own form. This means the customer is taken away from your checkout and they pay on the form provided by your payment gateway. They are then redirected to your confirmation page once the customer successfully pays. This allows you to have a bit more control of the checkout process. Now you can circumvent Shopify’s limitations in that they don’t let you customise the checkout other than with CSS.
Payment gateway transaction fees are added on top of Shopify’s own transaction fees. However as of November stores based in the US and UK can use Shopify Payments. Depending upon your Shopify plan, you can save on these extra costs. Relative to your plan you will receive these highly appealing rates.
  • Basic 2.4% + 20p
  • Professional 2.1% + 20p
  • Unlimited 1.8% + 20p
Depending on how many transactions you make every month it could be worth upgrading to take advantage of these savings.
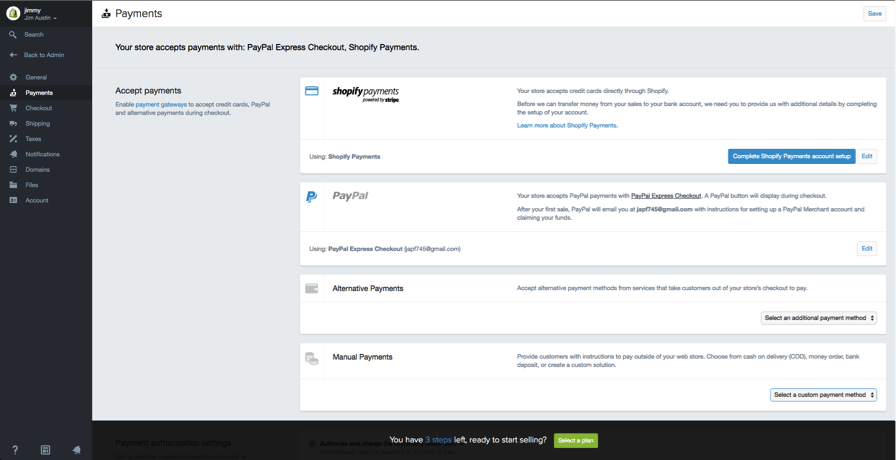
If you live in the US or UK your store will automatically use Shopify Payments. To complete this, click the ‘Complete Shopify Payments account setup’ button found in Settings > Payments. If you wish to use a third party gateway you can use the ‘enable payment gateways’ link on the same page.

6. Get Your Online Shop “LIVE”

Before your site can go live you need to add a few more details about your company and how you plan to make deliveries and pay tax.

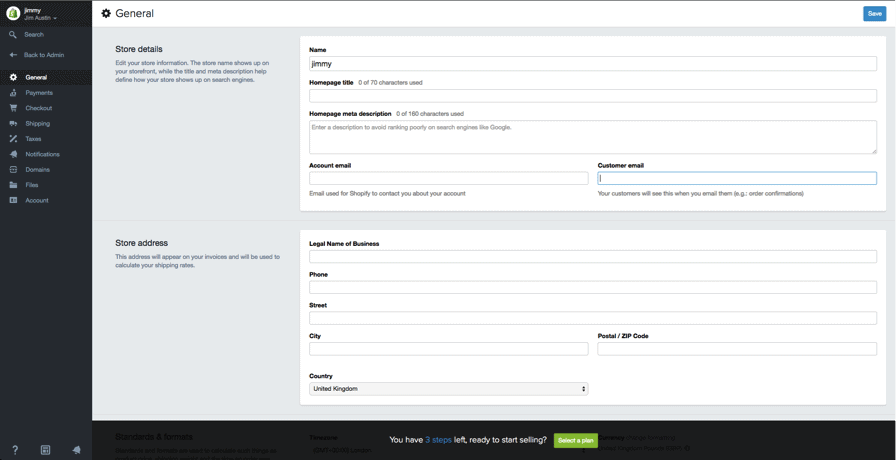
General

Make sure all your business information is filled out on this page. Also make sure to make use of the Google Analytics feature. This can prove to be an invaluable source for tracking your stores visitors.
general shopify settings

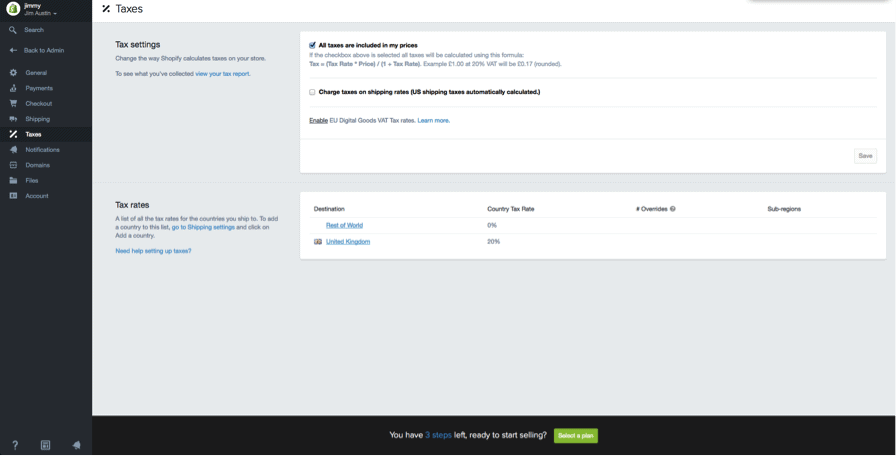
Taxes

taxes for shopify online store

  1. Go to the Products page of your admin
  1. Click on the name of a given product.
  1. Scroll down to the section called “Inventory & variants”.
  1. Click on the edit link next to your Product Variant to open a dialog window.
  1. Make sure the checkboxes next to Charge taxes and Requires shipping are checked if you need to include these with your products.
  1. Some stores won’t need to charge taxes or shipping on products like digital goods. On the other hand, a T-shirt store will likely need to charge both.
  1. If you are planning to ship your product to customers, make sure to enter the product’s weight in the appropriate field.

Shipping

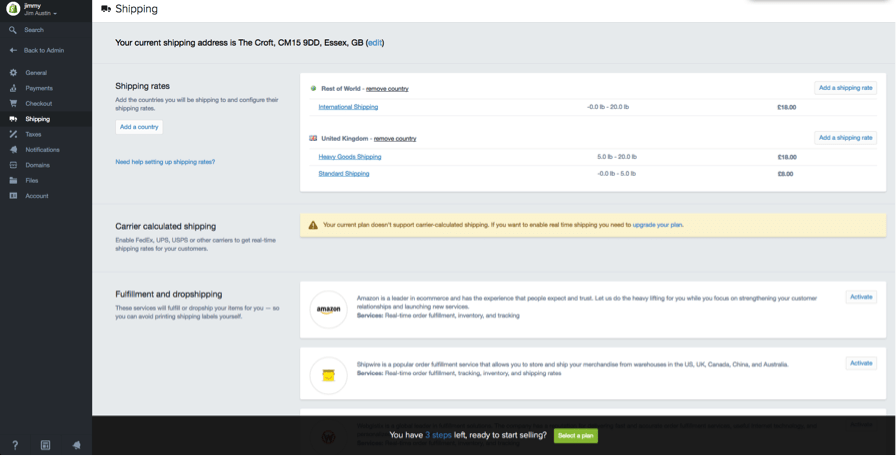
If your shipping rates are too narrow, or you don’t give enough options, you may lose out on some sales. Shopify will only calculate a shipping rate for your customers based on the rules that you define in the Shipping page of the admin. To make sure you won’t lose any sales:
shipping
  1. From your store admin, go to the Settings > Shipping page.
  1. In the “Shipping rates” section, look to see if you have set a weight-based shipping rate and adjust it according to your product’s specifications.

Test your order system

To test your system you can simulate a transaction using Shopify’s Bogus Gateway.
To use the Bogus Gateway:
  1. From your store Admin, click Settings, then Payments to go to your Payments settings
  1. If you have a credit card gateway enabled, deactivate it before continuing. (Click Edit, then Deactivate, then confirm your deactivation.)
  1. In the Accept credit cards section, click Select a Credit Card Gateway to open the drop-down menu.
  1. Scroll down the list to Other, then click (for testing) Bogus Gateway.
  1. Click Activate (or Reactivate, if you’ve used the Bogus Gateway before).
  1. Go to your storefront and place an order as a customer would. At checkout, enter the following credit card details instead of genuine numbers:
Testing a real payment gateway with a genuine transaction:
  1. Make sure you’ve set up the payment gateway you want to test.
  1. Make a purchase from your store as a customer would, and complete checkout using genuine credit card details.
  1. Cancel the order immediately, to refund yourself and avoid paying transaction fees.
  1. Log in to your payment gateway to make sure the funds went through.

Is this free?

Yes – just be sure to cancel and refund the order soon after you place it.
If your billing cycle hits after you’ve placed the test order but before you cancel it, the transaction fees will appear on your bill. You can still cancel after paying your bill to Shopify, but you’ll receive the refund as a transaction credit on your account. You can use transaction credits to pay future transaction fees.

7. Consider Buying a Domain Name

To get your site live you’ll need a domain name. You have two choices for this. Firstly you can buy a domain from Shopify and it will be added to your store automatically. This saves you time, especially if you have no knowledge of hosting a website. These domains typically cost $9-$14 USD per year. Your second option is to purchase a domain from a third party such as GoDaddy. These domains start from $1.99 USD a year. The downside is that you’ll have to redirect the DNS records yourself which can seem daunting at first.
If you’re unable to come up with a good domain name, read my tips on how to choose a domain name.
Here are the steps to put your new Shopify store live on a third party domain name.
  1. Add the new domain in Shopify
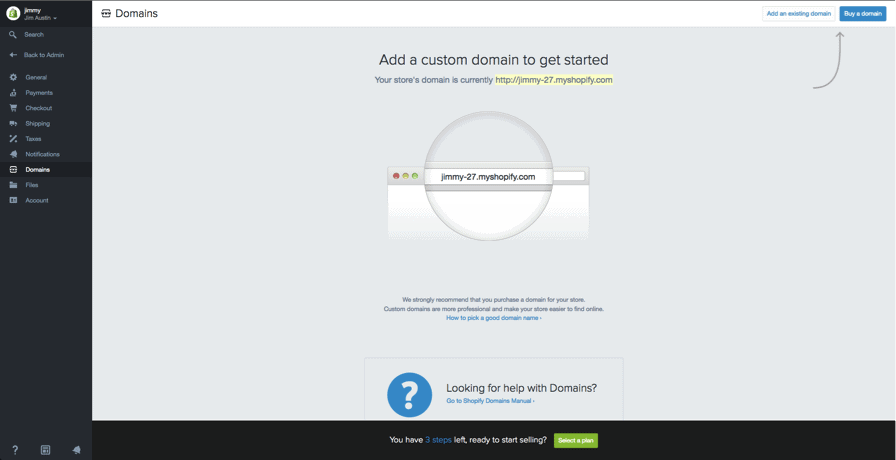
In the Shopify admin, from the left hand navigation go to Settings and then Domainsand add your domain name using the ‘Add an existing domain’ button.
  1. Update DNS records
Login to your domain registrar and make the following changes to the DNS records:
  • Replace the @ or main A record with the following IP address: 23.227.38.32
  • Add or replace the www CNAME with storename.myshopify.com (i.e. your store Shopify link without the http bit, which you can see on the domains settings page)
  1. Remove any storefront passwords
Otherwise no one will be able to access your site even once it’s live.
  1. Set as primary if relevant
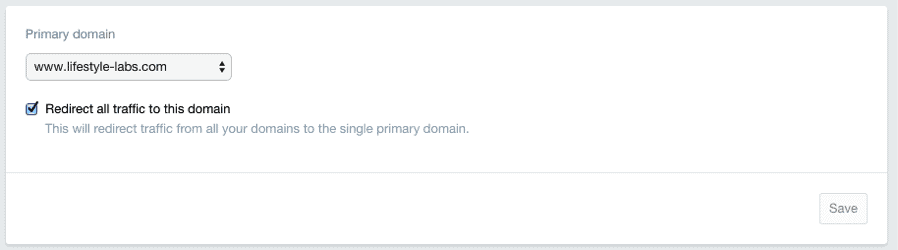
Whilst in Settings > Domains, you can choose your main domain by using the dropdown at the top of the screen:
primary domain
Ensure that you also check the ‘Redirect all traffic to this domain’. This means that traffic to all other domains will be directed to your primary domain. This is crucial for good SEO.
  1. Adding other domains 
You can repeat steps 1 and 2 with other domain names you own. All domain names will redirect to the ‘Primary’ domain, which you can change at any time with the ‘Set as primary’ option next to each domain name.
Note that the number of domain names you own has no influence on SEO.
adding custom domains on shopify

Conclusion

And that is all there is to it. In theory you can have a great looking, unique and fully-functioning store in less than half an hour without having to be a web expert. This way you can spend most of your time marketing your product rather than having to maintain the site.

Alternatives for Shopify?

I’ve been mainly using WordPress & WooCommerce combo (cheaper & easier), but Shopify can be a good alternative.
For further reading: Shopify vs. WordPress (WooCommerce)
Furthermore, you can actually build an ecommerce site with website builders, too. If you want to check them out, read my website builders review here.
In regards to customisation, Shopify allows almost every aspect of their templates to be altered in some way. You can also change the functionality of most parts of your site. On top of this they also have the largest app store for added functionality. Comparatively, Volusion only has one template that can only have minor changes made to it.
The only real downside is not being able to fully customise your checkout. Shopify restricts access to this page for security reasons. However the checkout comes fully responsive, so it will work perfectly for customers shopping on mobile devices.
Read More

Marketers Refer Google Apps - Earn up to US$750 per referral- Start referring today

Leave a Comment
Mobile apps ecosystem has grown in the past couple of years to become lucrative business for app developers and platform owners. Such has been the craze for applications these days, that you have educational courses based on coding and app development especially for Android. People centered around the business have made a lot of money but now Google is giving consumers the chance to make money which will benefit their business in the end. 

Marketers Refer Google Apps - Earn up to US$750 per referral.


By joining the Google Apps Referral Program, you’ll receive US $7.50 for every user who signs up using your link. Google Apps for Work gives businesses the tools to get more done with professional email, online storage, shared calendars, video meetings and more.


Thank you for joining the Google Apps Referral Programme


You're on your way to helping customers, friends and others experience a better way of working.

To get started, check your email for your unique referral link, coupons to share and more.

Can’t find your welcome email?

First, check your Promotions tab in Gmail or spam folders and if you still can't find the email after 24 hours, email us at AppsReferralProgram@google.com.

Sign up and start referring today.


Just provide your name and email address 
You’ll receive your unique referral link in your inbox 
What you need to know 
A bank account is required to receive direct deposits 
The programme is available in select countries 

"The referral program makes it easy to share Google Apps with your network and show them how they too can use these tools at work. You'll earn $7.50 for each new Google Apps user you refer", as mentioned by Google on the referral page.

Join-Share-Earn is the modus operandi within which the referral program works and here's how you stand a chance to make money by referring apps to one or more users.
- Register with your email ID, add bank a/c details (where money goes directly).
- Once you've registered, Google will send you a referral link to be shared.
- More the people signing up for the app, more money you get to earn.
- The money gets transferred to your bank a/c you shared and there's even coupons too.

Referral program is another interesting initiative from Google and India is one of the 120 countries wherein the service has been made available. Want to make extra buck? Google referral program may be the best (and legitimate) way of earning quick money without putting much effort.

Frequently Asked Questions


1. Where can I find my referral link?

Your referral link can be found in the welcome email you received after registering for the program. The email was sent from the Google Apps Referral Program and you should receive it within 24 hours.


If you can’t find your welcome email, please check your "Promotions” tab in Gmail. You can also email AppsReferralProgram@google.com with the email address you signed up with if you still can’t find your link.

2. How much can I earn?


As a member of the Google Apps Referral Program, you can earn US $7.50 per user for every new Google Apps for Work customer you refer. You are eligible for payment on your customer’s first 100 users and there is no limit to the number of customers you can refer.


A user is an individual account belonging to the customer domain. Your referral amount will be based on the number of users who have paid for at least 120 days.

3. Who is eligible for referral payment?


Customers are eligible for payment if they are new Google Apps for Work customers and have not previously signed up for a trial.

4. How does the coupon code discount work?


If you provide a coupon code to one of your referrals, he/she is entitled to 20% off per user for the first year as a Google Apps for Work customer. Your referrals can enter their coupon code in the Billing section of their Customer Admin Console when they sign up or throughout their 30-day trial period.

Each coupon code is unique and can only be redeemed by one customer from the country you signed up in.

5. When and how will I get paid?


You will be eligible for payment once your referral has been a paid Google Apps customer for at least 120 days. When you’re eligible for your first payment, we’ll reach out for your banking information through our secure form. You will then receive a direct deposit in your bank account.

6. Why haven’t I received my payment in my bank account?


Payments are processed on a monthly basis. If you did not receive a payment, you will likely receive it during next month’s payment cycle. Please contact AppsReferralProgram@google.com with your account details to verify.

7. My referrals forgot to use my referral link. Is there a way to track it back to my account?


We're unable to track referrals back to your account if they did not use your referral link at the time they signed up.

8. Can I get paid for previous customers I referred before the Referral Program launched or before I signed up?


The Referral Program tracks referrals that are new Google Apps for Work customers. We cannot grant referral credits to customers who have signed up or started a trial before the program launched or before you joined.

When will the Referral Program be available in my country?


The Google Apps Referral Program is currently available in the US, Canada, Australia, Brazil, Spain, India, Chile, Colombia, Mexico, Japan, New Zealand, Singapore, Hong Kong and the UK. We don’t have exact timing, but hope to expand to your region soon. Let us know where you’re located and how to contact you once we do.

9. Can I refer customers in any country?


You can only refer customers in the country programs you signed up for. Currently, the program is available in the US, Canada, Australia, Brazil, Spain, India, Chile, Colombia, Mexico, Japan, New Zealand, Singapore, Hong Kong and the UK. You also need a bank account in each country you register for.


For example, if you live in India and would like to refer customers that work in the US, you must sign up for the US program and have a US bank account that can receive direct deposits.


At this time, credit will not be given for referred customers outside of the countries listed above.
Read More
Next PostNewer Posts Previous PostOlder Posts Home